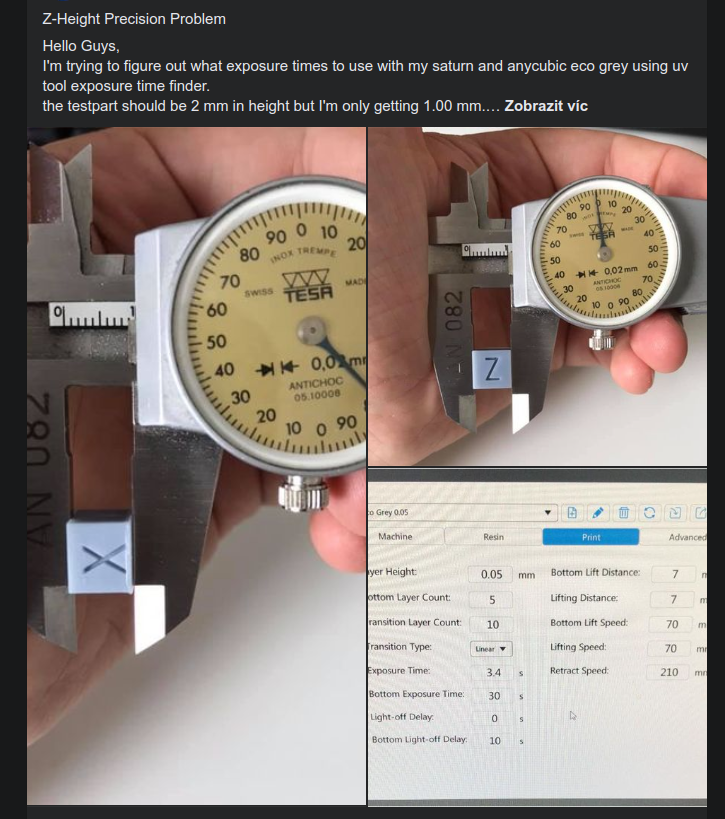
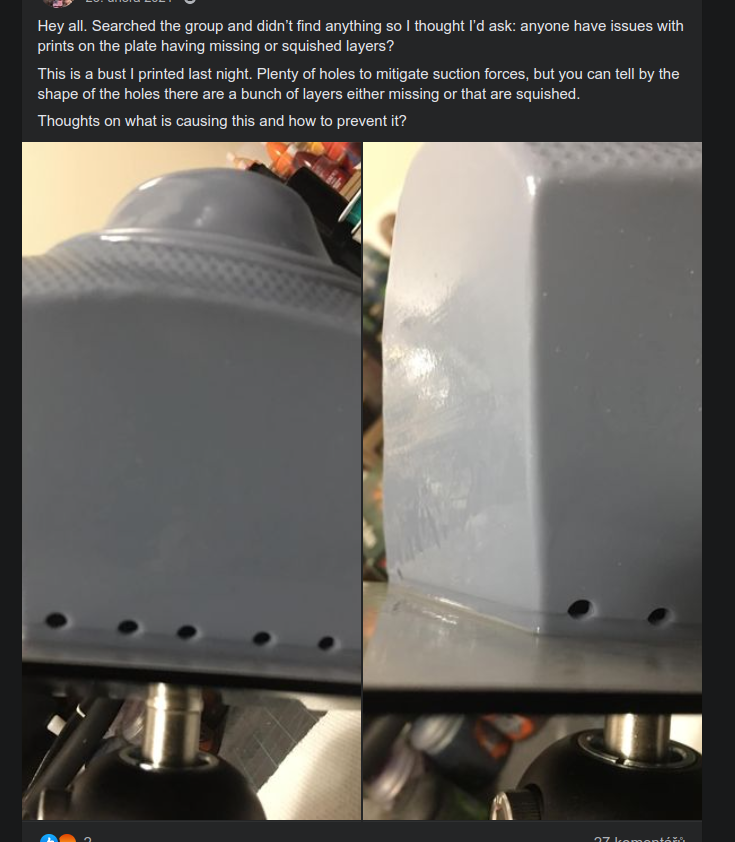
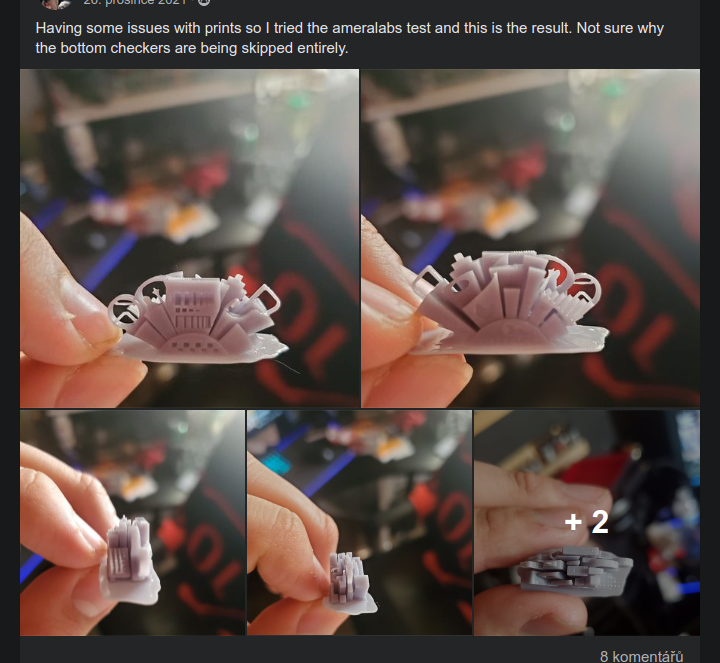
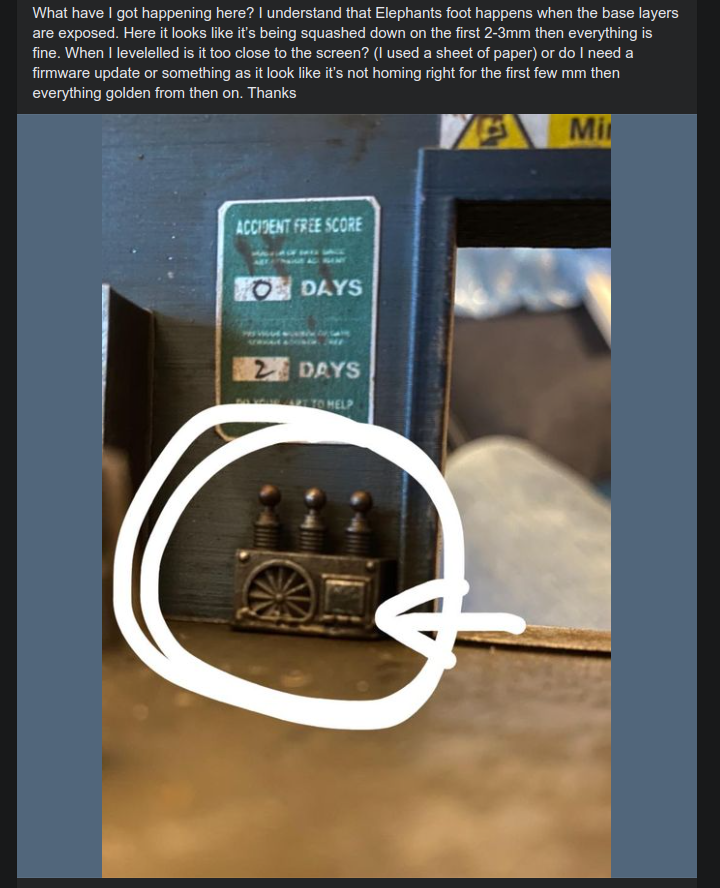
Many users of Chitu-powered resin printers complain that when they print flat on the bed, their prints are shorter than they should be – usually around 0.3–1 mm. This forces the users to print on supports. Back in the days when I started with resin printers, I observed the same thing on my Elegoo Mars. The cause of that was poor construction (see full explanation). I haven’t observed such problems on Elegoo Saturn – until now. Let’s explore what causes it and how to fix it.
You see people fighting this problem by leveling against a paper folded various number of times, setting arbitrary numbers to Z-offset and similar. Everyone has a custom recipe. I will give you my recipe which I think works the best – and unlike the others, I will explain you why. I tested everything on Elegoo Saturn, but I believe it applies to all Chitu-based printers.
Possible causes
There are two possible causes for the problem you observe – one is hardware, and the second one is software.
I own Saturn from the first and second pre-order batches. These Saturn have a counter bearing on top of the Z-axis to prevent the screw from moving. It is not the best solution, but it is better than nothing. From the photos that my readers sent me, it seems that newer Saturns don’t have this bearing. Unless Elegoo changed the motor’s construction, new Saturns might face the same problem as Mars (related blog post). However, I doubt that Elegoo would make the same mistake, so I don’t believe this is the root cause. However, since I don’t own new enough Saturn, I cannot confirm this.
The second cause is purely software one: I started experiencing shorter prints after updating Saturn’s firmware to V4.4.3. When I observed the printer during operation, I noticed how much does the printer’s construction bend. I also noticed that the movement of the printer is strange – during the printing of the bottom layers, the printer actually moved pass the limit switch. When I measured it, the printer moved 0.5 mm below the limit switch. This wasn’t the case before.
Therefore, you level your build plate when the Z-axis is on the bottom switch and then, when you print, it moves lower. This is the source of squished layers. I think there is a hard-coded constant in these printers that tells the printer to start printing below the home position. We might only speculate why is this “feature” here. But I see two possible explanations:
- it is a measure to build up a large force to speed up resing squeezing during the formation of the bottom layers. The goal is to probably fight insufficient bed adhesion. There are better ways to get the adhesion just right: read my posts on this topic: Introduction and a practical guide.
- alternatively, this might have something to do with leveling cards that people were asking for. These cards make no sense, but people asked for them (oh no, you cannot level agains bare LCD! You will damage it. No, you won’t). And it is a way to counteact their thickness.
It is sad that the behavior is undocumented and it only makes me distrust Chitu closed ecosystem even more. Nevertheless, there’s a simple solution.
How to level your build plate to avoid squishing layers
Since we know the printer moves below the home switch, we know that we can’t level the build plate when the printer is in the home position. Instead, we want to level the build plate when it is on the starting position of the print. Therefore:
- create a dummy printer file – e.g., with a small simple model. Setup layer thickness 0.01 mm (the smallest Chitu slicer allows you to). Slice the file and prepare it for printing. I don’t provide this file as you have to slice it for the machine you have.
- Prepare your printer such that there is an empty and clean tank in place.
- Loosen screws on the build plate.
- Mount the build plate on the printer.
- Start printing your dummy model.
- Once printer starts exposing the bottom layer, turn the printer off. In this way, the build plate stays in the position where the printer truly starts the print.
- Tighten the screws.
That’s it. Now you have properly levelled your printer such that there are no squished layers. Give it a try and let me know in the comments. Note that you should also add sufficient rest times to your bottom layers to get the build plate adhesion just right and remove elephant foot: Introduction and a practical guide.
And what about the paper? And how do I ensure my build plate is flat?
Surprisingly, people are very opinionated about the way you level. One common way you hear is that you have to use the traditional machinist way of using a paper or thin metal sheet moving under the object and finding out when it grips.
This is indeed a very common and traditional method of finding Z-offset e.g., on a mill. It is used as you don’t want to scratch the surface via the tool. However, we don’t have such a problem with the build plate. Also, you don’t have a way to offset the sheet thickness.
The second argument you hear “But how do you make sure that the build plate is flat and all corners sit on the LCD?”. Well, easy – just push it slightly or rely only on the spring in the build plate. It is enough as there are no forces to counteract. Also, if you are scared that the screw will grip the ball of the build plate, don’t be. There is an aluminum sleeve/collect to grab the build plate’s ball, so the screw never grips the ball. Also, it is possible that the build plate is not straight and not all corners are laying on the LCD. You will detect this with a thin sheet, but what can you do about it? If it is not flat, there is no way to level it so all corners sit flat.
Recent news: My open letter to the 3D-printing community
I love the 3D-printing community, but I think there is room for improvement. Let's get better in 2023! Read the full letter.
Support my work!
If you like my work (these blog posts, my software and CAD models) and you would like to see more posts on various topics coming, consider supporting me in various ways:
- You can become my sponsor on Github.
- If you prefer, you can also become my Patreon.
- You can buy me a coffee on Ko-fi,
- or you can buy something from my Tindie store (also see below),
- Or you can just share my work!
If you are interested in knowing what I am up to and recent sneak-peaks, consider following me on social media (Twitter, Instagram, Facebook).
My store offers
I launched new tank cleaning kits for Elegoo Saturn, Saturn S, Mars 1, and Mars 3. You can find them in my store.
Great writeup and you are correct most of the older Chitu firmwares do move beyond the switch stopping point. There is a simpler leveling method however.
Grab a .3mm spacer or 3 sheets of 80lb copy paper.
Remove the vat. (I was doing it the way you described and it was very rare my vat was ever empty)
Start a print and when the machine lowers the loosened builtplate turn off the machine and tighten the screws.
I documented this in my kit and in the Phrozen Sonic Mini 4k Community on Fb. Love your work keep it up.
Hm, I came to a different solution- by removing backlash in the Z-axis screw by adding a thrust bearing+shaft collar in the method shown here- https://imgur.com/a/sQNRiAu I was able to solve this squash problem personally. Curious that you found it to be a software issue, this and the various other flaws and inadequacies in these resin printers- many of which you’ve uncovered- really make me wish for an open source driver board.
does this recommendation (blank file, loosen screws, begin print, shut off and tighten, done {no setting Z=0}) trump your recommendation for leveling against the empty vat? As in, just to be certain, do it this way and not only will the bed be level but we will get compensate for any possible software issues.
And a follow up…I’m confused between this and your “bottom layer and elephant’s foot” post and other people’s recommendations…specifically the 2-3x normal exposure time for bottom exposure. So I’ve been using the “Cones of Calibration” to test my normal exposure settings. After I get a good result there, I should just multiply that normal exposure by 3…for example on Mars 3 if it’s a 2.5s normal then bottom should only be like 9ish seconds? I’m just asking because that is WAY lower than what others recommend.
I’m curious what method you use to calibrate your normal exposure, and if after doing so you confidently place it at 2-3x that and just move on. I’m printing both minis as well as functional things.
Yes, I level the build plate just like I describe here. I use ~15s delay before exposure on the layers in the first 1 mm, and I use 2 base layers with 3× the normal exposure.
If you are confused, ask the people why their procedure works. I try to support all my claims with experiments and measured data. So I am confident that the procedures I present indeed work and it is not an advice from a thin air.
Hello Jan,
first of all, thank you for sharing all your research and findings with the world. Your insights about rest times have improved my prints by 300%.
Now to this subject — I’ve been suffering from squished prints lately on my Mars 2 Pro, too. When I first started resin printing about a year ago, I followed the usual instructions: level with a paper, tighten the screws, up the plate until the paper can be removed with some friction. It usually worked well. In the ever learning process, I tried various other methods, the latest was to level the build plate in the VAT and that’s where the trouble started. After reading your post here, I tried your method and at first, it made things even worse.
Turns out — and this is important — the spring in the ball joint of the build plate has too much upwards force. Meaning, with the screws loose the build plate settles on the screen, paper, or VAT but the spring has so much force upwards that it already bends the Z structure backwards. I tighten the screws and I have to press around 5 times 0.1 mm up movement for any paper to be pulled out from under the build plate. This is also observed by the paper being looser on the back of the build plate due to the angle change after the force is release by the up movement.
After I removed the spring from the ball joint, everything is much more relaxed. The paper moves after just one movement of 0.1 upwards, and my prints come out flawlessly. Next, I try again with your method, just this time without the spring.
When you think about it, other printers have no spring on their build plate. Gravity will do the work.
I hope this helps some of you still having trouble. Remember, the leveling process is a two-step process. Leveling — is to make sure the build plate and screen are parallel. Build plate height — make sure the build plate is at a proper starting point atop the FEP for layer adhesion and build up.
Again, thank you for all your shared knowledge. I’ve made some testing of layer to layer anti-aliasing, if you’re interested we can have a chat about it.
Have a great weekend.
Andreas
Hi Jan, thank you for your blog.
Looks very complicated what you are describing here.
One thing that is important, in order to understand why you get Z-axis compression is:
Every time a print is started, the stepper motor start position (Z = 0) is “calibrated” by searching the end stop sensor position.
This stepper calibration is done very violently by the Chitubox firmware, the build plate is moved towards the end stop sensor position with high speed, not allowing time for the resin to escape. Therefore the mechanical construction will bend, the slack in the motor will be used etc. which all results in a false calibration, compared to the “true” stepper calibration that can be done without resin in the container. The firmware will think, that the stepper motor start position (Z = 0) is somewhere below the bottom of the resin container!
However, there is a simple method to avoid this miscalibration: Use an approx. 1 mm thick sheet when doing the build plate levelling. This can be achieved by using 12 sheets of normal printer paper (each sheet is 0.1 mm thick). Divide 3 pcs. of A4 printer paper in each 4 parts (A6 size parts). This will give you 12 x A6 size papers. A6 format fits the size of the resin container.
When the levelling procedure has been done using this approx. 1.2 mm spacer (the actual thickness is not very important), you need to use a single sheet of paper for setting the Z=0 position. Use the manual up/down buttons to adjust the build plate position until a single sheet of paper moves freely under the build plate. Then press the “Z=0” button on the display.
After this type of build-plate levelling, this is what happens when a print is started: The firmware searches for the end-stop signal and finds it in convenient distance (1.2 mm) from the bottom of the resin container. No excessive force was needed to reach this position, so the stepper calibration is fine. After the end-stop position is found, all further movements of the build plate is done by calculating stepper motor steps. By using appropriate rest/delay times in your print definitions, you will therefore be able to neutralize the bending and slack in the mechanics, -the stepper is in the right position, you just need to wait until the mechanic structures has “settled” after having squeezed out the resin from the gap between the build plate and the display.
I, like you, are printing a lot directly on the buildplate and after having used the levelling method described above, I have no Z-axis compression.
I don’t understand why Elegoo, Chitubox and others don’t recommend a method like this, as this seems to be an obvious way to increase Z-axis accuracy.
Hi Arne,
That actually works!
Thanks so much, I didn’t know about the relationship between the Z stop and Z=0.
For clarification: when pressing start print, the build plate will first home to THE ENDSTOP. After the it will lift slightly and then move to (Z=0) minus one layer height by counting the stepper increments. When setting Z=0 all we do is define the distance between Endstop and actual (Z=0) in terms of stepper increments.
Only thing is, when going to the first layer, my stepper makes a sqeequing noise as if its torque limit is exceeded and it misses a couple of steps.
I guess the viscosity of the resin causes forces too high for the motor to overcome.
Maybe if theres a way of lower the initial retract speed the force can be minimized, however i’m not sure which if any of the chitu settings influences that.
Thanks Jan for sparking the discussion and your awesome blog. Thanks Arne for the heads up on endstop vs z=0.
On the one hand great to find a solution. On the other hand just frustrating that such things aren’t documented anywhere by elegoo or chitu.
I need to correct myself. Arnes solution didn’t work for me. It actually made it worse (lost 2 mm in height…)
Setting z=0 by manually lowering the build plate has not the desired effect since as jan mentioned, the build plate is indeed going to Z= -0.5 in the beginning.
So what i came up with is:
Without build plate attached, set z=0 to -0.5 lower than the endstop sensor. This way, it will not go to layer height distance to fep on the first lowering cycle but on the second slower one.
After that, attach but loosen the build plate. Remove the vat and put 2x80g a4 sheets of paper on the screen.
Level by starting a print and, when the build plate is in position for the first layer, fix the build plate.
This way I reduced the missing height to 0.1 mm, which I’m happy with.
Hello, Arne!
Your method works like a charm!
It solved the squished layer that I was facing.
All the info in Jan’s blog and zour explanation and method are very valuable, and help me progress in resin printing.
A big thanks to both!
Hi Arne,
Just confirming, this worked perfectly for me on Saturn 2
Prints have gone from being consistently 0.4mm undersized to 0.02mm oversized in the z-axis.
Combined with Jan’s excellent elephants foot removal technique stuff is now coming out dimensionally bang on direct on the build plate.
Hi Arne,
Unfortunately on Phrozen Sonic Mighty 8k (and I guess other Phrozen printers), this is impossible, since the firmware does not allow you to move past the height at which the optical sensor was triggered, so you can only set the z offset to positive values, not negative. You can try to level it with the standard procedure and then finetune the Z-offset manually to positive values to get the results needed. I personally have a situation where I lose around 0.3 to 0.5 iz Z-height and the bottom feautures get squished, so I will try with a 0.3 positive offset, a go from there. Or I can try using multiple papers for leveling until I get the height right. I’ve also thought about Jan’s method here, but in Phrozen Sonic Mighty 8k I don’t think that it goes below the Z=0 when printing the first layer honestly, nor can I see/feel the leadscrew/gantry flexing when homing into a full resin vat. It just squishes the first several layers and I think it’s just a matter of finetuning the z-offset until you get it right. There is also a suggestion in the menu interface of the printer to tune thr z-offset if you are printing directly on the plate. Also, I’m still not comfortable in trying the bottom layer exposures of less than 20-25 sec, since I usually print bigger parts flat on the plate (and the plate is big, plus I am using a magnetic flexplate) and I had problems with corners detaching when I use less exposure, but I will try to follow all of Jan’s great suggestions and slowly start decreasing the bottom exposure until I find a sweet spot for larger parts.
Is the 0.5mm drop below the z-stop a typo?
I could see 0.05mm below without grinding, but not 0.5mm
It is not. The Saturn’s construction is very flexible. If you go below, the Z-column bends. You can easily go over 3mm below the home position without loosing steps on the motor.
Sorry, I don’t really get it.
When the printer starts printing the first layer, is it not “hovering” above the FEP slightly? Or, because the screws are loose, the spring keeps the build plate pressed on the LCD? So when you turn off the machine and tighten the screws, the actual build plate mount is in the correct starting point? The FEP is what gives it the distance?
From my understanding, because you set it to 0.01mm in the software which is the lowest it can go, you’re effectively having the printer set itself touching the FEP anyway. Most people will be printing with 0.05mm layers, and the 1/5 of one layer difference in the end result is negligible when compared to the normal way of leveling printer beds which doesnt include the FEP at all
Well, I tried this method and my z-height got worse – i.e., my part got shorter in the z direction. Now I am using a Wham Bam flex plate with a spacer that is slightly not 2mm in thickness which could be screwing things up. Any ideas why this method (turning off the machine during the first 0.01mm layer) made things worse?
BTW this is on a Mars 3 Pro brand new with latest firmware and latest Chitu software.
On Mars 3/Chitu V4.5 there is more to it. And there is a nasty trick in Chitu software, for the first layer all the parameters are ignored (retract speed, etc). So if you look closely, even if your calibration point is above the resin, for the first layer the platform can plunge to the bottom of the tank at very high retract speed. Creating a lot of strain and possibly de-leveling the platform. Plus, if the resin is interfering with the pre-print calibration the Z-axis could be off (particularly if you have Zend=Z0).
To counteract that, one approach is to use the empty-0-layer trick of UvTools plus change the lift-up parameter for the layer 1 to a high value (100mm). And insert the resin vat while the plate is raising to 100mm. This avoids any interactions of the plate with the resin during Zend calibration and avoids a plunge at high velocity for buggy layer 0.
Hi
do I understand correct, that after tightening the screws we skip setting Z=0 (pressing this button)?
Best regards,
Dobroslaw
Yes. You cannot press the button as the printer is powered off. If you power it, the printer has no idea about its position. So pressing the button after powering it on actually counter acts everything you did before.
Dear Jan,
thank you very much for the answer and sharing your experience and insights. Your posts help me to understand the process of 3D printing, as I am just at very begining of this journey. For me the understanding of the process, its fundation and physics, is one of the key elements in mastering it and properly setting equimpment. Once again thank you very much and all the best in the future! I look forward to your future posts about 3d printing.
Best regards,
Dobrosław
Hi, thanks for all of your valuable work Jan!
But now im super confused – dummy print, power off, tighten screws, but never press z=0? What are we doing then with this whole process if not resetting the new home position?
Im confused what your suggestions mean I should do after i turn the printer back on and want to print
The printer uses stepper motors that have no sense of absolute position. To get an absolute position, the printer has a homing sensor. When the printer hits it, it knows where it is.
“Z=0” just gives information about the relative position of where the print will start to the home position. The Z-offset is stored in non-volatile memory, so it is the same between power-offs. With this method, you don’t care what’s the value there (unless it is too much below or too much above for the leveling mechanism to compensate). Why you don’t care? Because you tighten the build plate when the printer wants to print the initial layer (when it is powered off). It doesn’t matter if the printer uses an offset of 0.01 mm or 1 mm. Because you tighten the build plate when the printer thinks it should be on the true zero. So yes, power on your printer and start printing.
Excellent procedure Jan, I’m excited to give it a try on my Saturn. I was personally getting around this issue by leveling the plate on a single sheet of paper (super thin) and then adding a -0.5mm offset in the gcode parameters file. I find that even with this (and applying proper wait times on the bottom 1mm) I’m still losing 250um of model height. I’ve resorted to cloning the bottom 5 layers of the model in UVTools :/ I also made a test model to help in measuring the amount of lost z-height, you can easily get calipers to measure the bottom ledge and there’s a cutout for the top ledge (both should measure 3mm). I’ve also put marks on the side to illustrate how much z-height is lost. Also, if properly printed the diamonds on the bottom should be fully visible.
Link to test model: https://www.thingiverse.com/thing:5329416
I will have to try this. I just got a Phrozen Sonic Mini 8k and it has the same problem of initially trying to lower the build plate past the actual screen, pushing on the LCD screen and resulting in the first few squished layers. Not only that, the adhesion is SUPER hard and prying the calibration print off usually results in cracking it. Not an issue when using a raft to print a supported model, but that pressure on the screen can’t be good.
Thank you, Jan. This series of experiments has helped me so much to understand what’s going on with the z-compression issue. I really appreciate your thorough, scientific approach to investigating this!
I’m printing on a Phrozen Sonic Mini 8K and just worked out a super simple solution I want to share with this group. It may or may not work with other printers, depending on the particular firmware update method. On my printer, the initial build plate retraction at the start of each print runs much too fast, so just like you observed, the build plate arm would flex imperceptibly due to the resin viscosity before the z-home sensor is triggered. This seems to be the source of my bottom layer compression of ~0.3-0.5 mm. Unfortunately this printer only reads .ctb files, and Chitubox does not export gcode edits in this filetype, so I could not include an M220 start gcode to slow down the overall homing process.
Instead, I harnessed the firmware update files to do this for me. I copied the “chitu_initial_file_autorun.FILE” found in the Phrozen firmware update package, deleted all of the M6030 commands referencing firmware update files, and added the “M8015 I1” and “M8016 I1” gcodes, which tell the printer how fast the motor should retract the build plate for each ctb model’s (seemingly built-in) G28 homing command.
Here’s the gcode in my autorun file:
M300 I10000
G4 P15000
M34 P0 D0
G21
G90
M300 I1000
M8015 I1
M8016 I1
G4 P10000
M300 I5000
I include M300 beeps and G4 dwell/pause times to know the code is working. M34 seems necessary to alphabetize the USB drive contents. I include G21 and G90 to be safe in knowing we’re using mm units and absolute position references.
When I have a flat print and want to prevent the compression, I just insert the USB before turning the printer on. It detects the autorun file and runs this code. Any subsequent prints then start by homing slow enough that the resin viscosity is barely an issue. M8015/16 do not affect the actual layer lift and retract speeds, nor do they permanently overwrite the machine’s internal defaults. A power restart deletes these changes, so the fix is optional if not building flat on the build plate.
Apologize if my terminology is incorrect. I do not have a coding background; I only figured this out with my own research! I’m not sure every printer with a Chitu-motherboard will correctly interpret this code, but maybe it’s a good start for another user. I reached out to Phrozen’s support and asked them to keep working on a better solution in a firmware update. Of course, Chitubox would need to implement changes on their end too. I really wish they would fix the gcode export in .ctb files!
Thanks again! Regards,
Hi Jeff. Maybe this is a stupid question, but Chitubox (v1.9.5) Settings has a Gcode tab with 3 input boxes labeled Start:, Interlayer:, and End:. Can the code you provided be used there?
Thanks, Jeff. And thank you Jan!
All the solutions I read here are beyond my current skillset. I noticed all my prints were shorter by 0.2mm which suggested a systematic error like the one discussed here. Not being able to follow any of the above advice, I just added the missing 0.2mm to my STLs by making them thicker in the z dimension and now they are coming out perfect. Stupid solution but hey if it works it works.
The light-off delay solution worked perfectly when i printed only one up to 4 models at a time. When i try to print about 30 at a time, the problem with squished layers appear again..(
possible causes:
– lift distance: increased to 12mm
– lift / retract speed: slowed down to 1mm/s
looks like some problem with suction forces, when the cross-section increases, but i can’t figure out what it is.
i’m printing small parts flat on the bed, that are 20mmx20mmx1.5mm
any ideas?
Thx for posting this. Tried it exactly as you describe with Epax E10 14k. Absolutely no improvement. First 40 layers of Sirayatech test model still extremely compressed. Remaining layers print properly. This is my 3rd attempt to fix fix the problem. How is this a problem in 2025??? My old Epax X1 prints the same file perfectly albeit lower resolution.