If you read my blog regularly, you might know that I try to push the accuracy of resin printing as much as possible, as I use resin printing for functional parts. We have already explored resin shrinkage, warping, blooming (part one and part two), and we also briefly touched on how temperature affects precision. However, I haven’t covered one of the most notable problems – cross-layer curing.
When you have geometry without overhangs, you don’t have to care. However, in practice, some overhangs are often necessary. In this post, we won’t look at techniques to avoid overhangs, and we will also not deal with overhangs that need to be supported. We will focus on the overhangs that are nicely printable – e.g., steep ones or such that cannot be supported, e.g., metric threads. Yes, you can actually print functional M3 threads right out of the printer. If you use the right resin and give the trial-and-error approach a chance, you can also get somewhat functional M2 treads.
How is a layer formed, and what is cross-layer curing
To fully understand the problem of dimensional inaccuracy caused by cross-layer curing, we first must understand how a layer in an LCD resin printer is formed. The general idea is – I hope – clear. A build plate sinks into the resin tank so that a thin layer of resin is between the resin tank film and the already printed part of the model. The LCD exposes this thin layer of resin to UV light and cures the resin. See the image below:

The following observations are noteworthy:
- the resin cures from the LCD to the model. If the resin was completely opaque to UV, it wouldn’t stick to the model as it wouldn’t cure there. Therefore, the resin must be translucent to form a layer of some thickness.
- If the resin was completely transparent/translucent, you couldn’t form an overhang – the UV light would penetrate deep, and it would cure the resin deeply. So you couldn’t form an overhang.
- So the resins include UV-blocking pigment in their formula that blocks the light and effectively forms an upper limit on how deep can the UV light penetrate. If you would like to learn how you can measure this, be sure to read Experiment 1 from this blog post. The light can penetrate the commonly available resins anywhere between 200-900 µm deep (according to experiments I did).
- Also, how deeply the resin is cured depends on the exposure. But we always have to expose enough to stick to the previous layer; otherwise, we see print failure in the form of layer delamination.
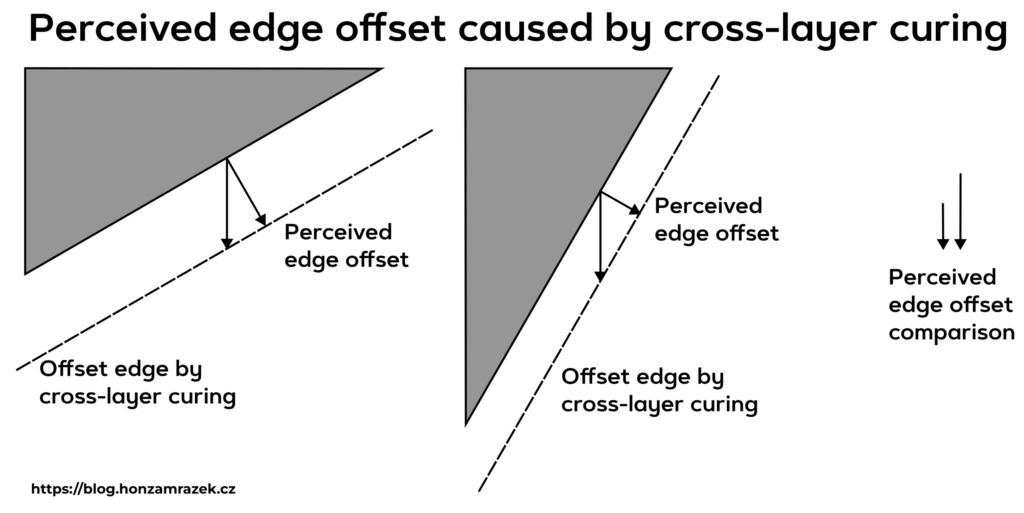
This observation leads us to a conclusion: When we have an overhang (not necessarily a bridge, a tilted surface is enough), there is no layer below to stick to, and we actually cure the resin in the previous layers, where no resin should be cured. See the image above for an illustration. This is what I call cross-layer curing.
What effects does cross-layer curing have on dimensional accuracy?
The basic and most notable effect is that all overhanging surfaces are shifted in the Z-axis direction. See below:
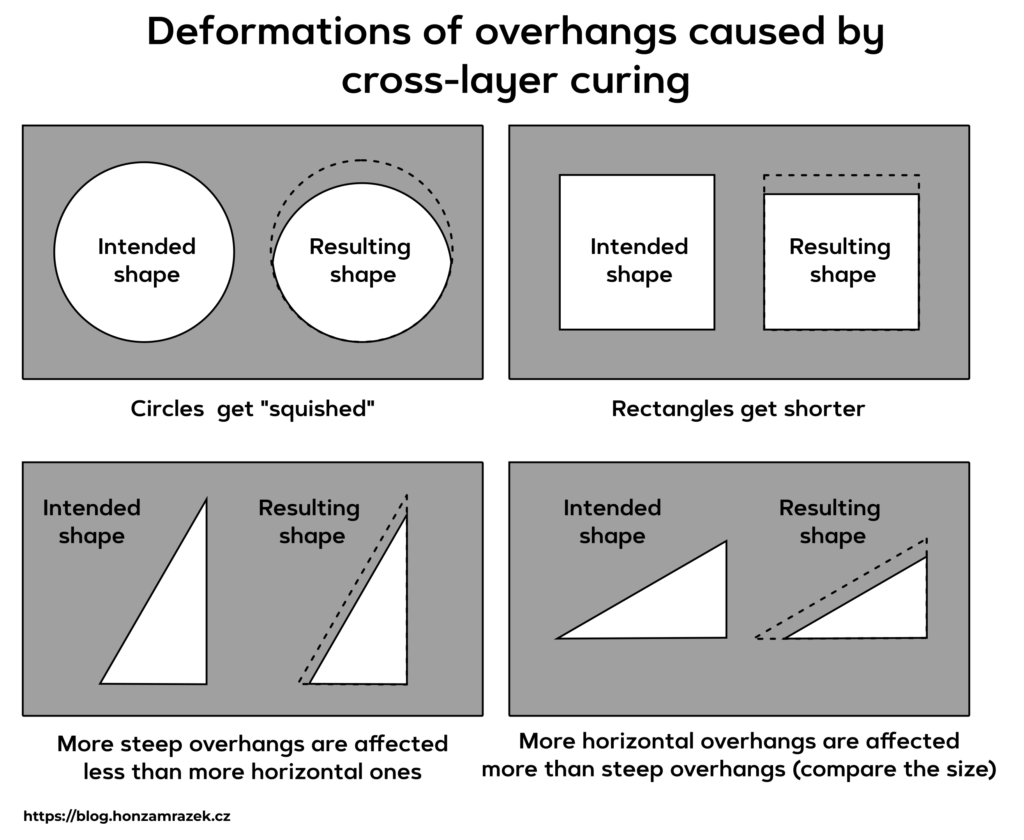
Do these shapes (especially on horizontal circles) look familiar? I see them all the time. If you want to test this yourself, I have prepared the following model where you can see the shape deformations.
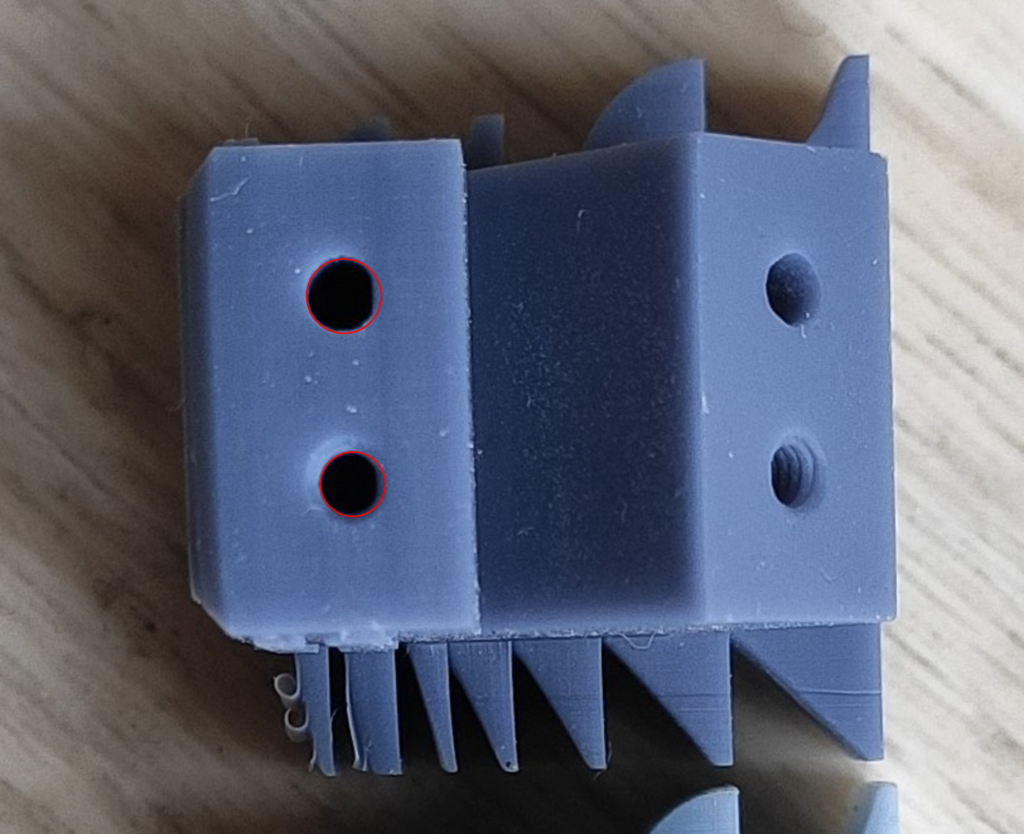
Horizontal holes aren't circular
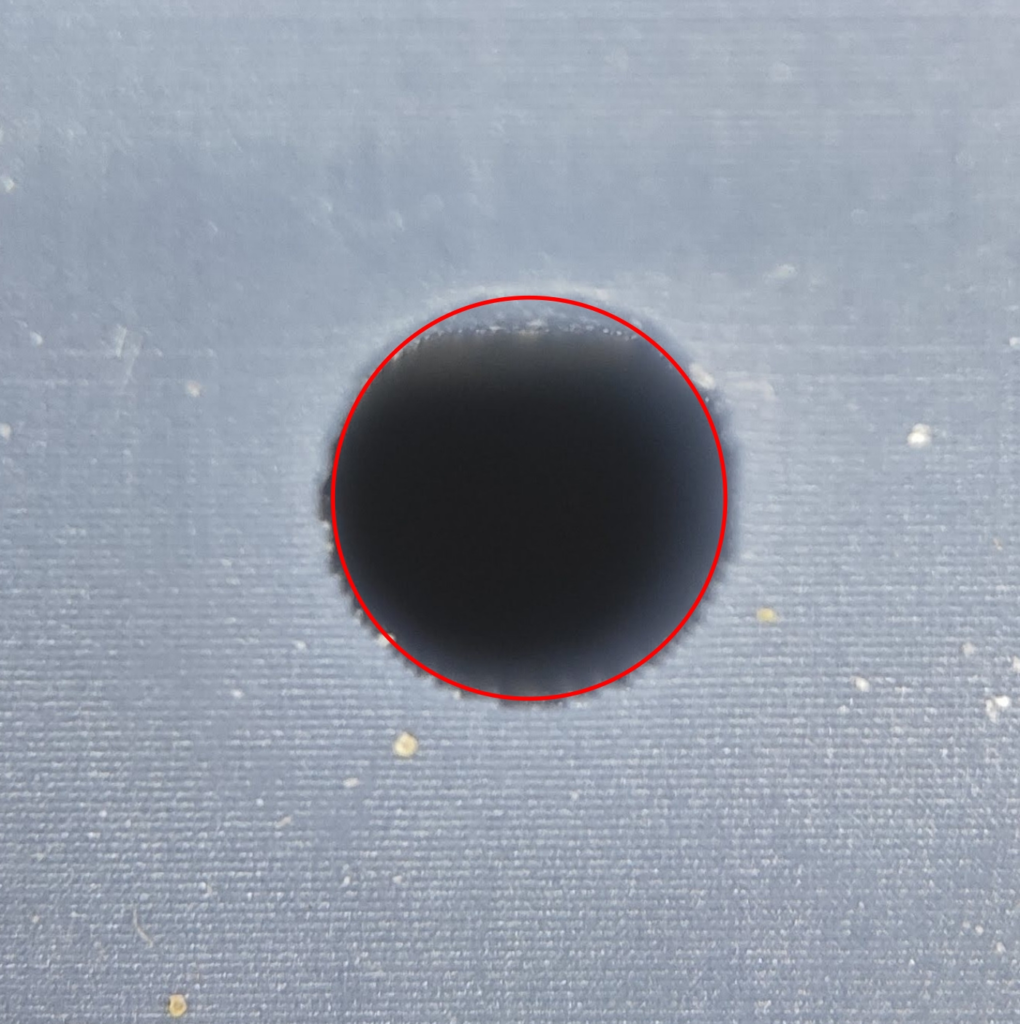
Detail of a circular hole - note the crisp voxels on the bottom and lost detail on the upper part.
There are also a couple of observations to make. All surface shifting happens in the Z-direction. Therefore, the apparent surface shift (perpendicular to the original surface) is more significant for more horizontal surfaces. Why? The cosine. See the illustration below:
Not everything is cross-layer curing
Note that for purely horizontal overhangs and bridges, there is an extra source of inaccuracy. After you form the first layer of an overhang, you have to peel it. The layer is very thin (100-200 µm) and thus soft and fragile. When you peel it, it can get damaged. When you sink the model back in the resin, the resin film is not strong enough to squeeze the resin into a thin layer. So you often see bulging or layer separation on such surfaces.
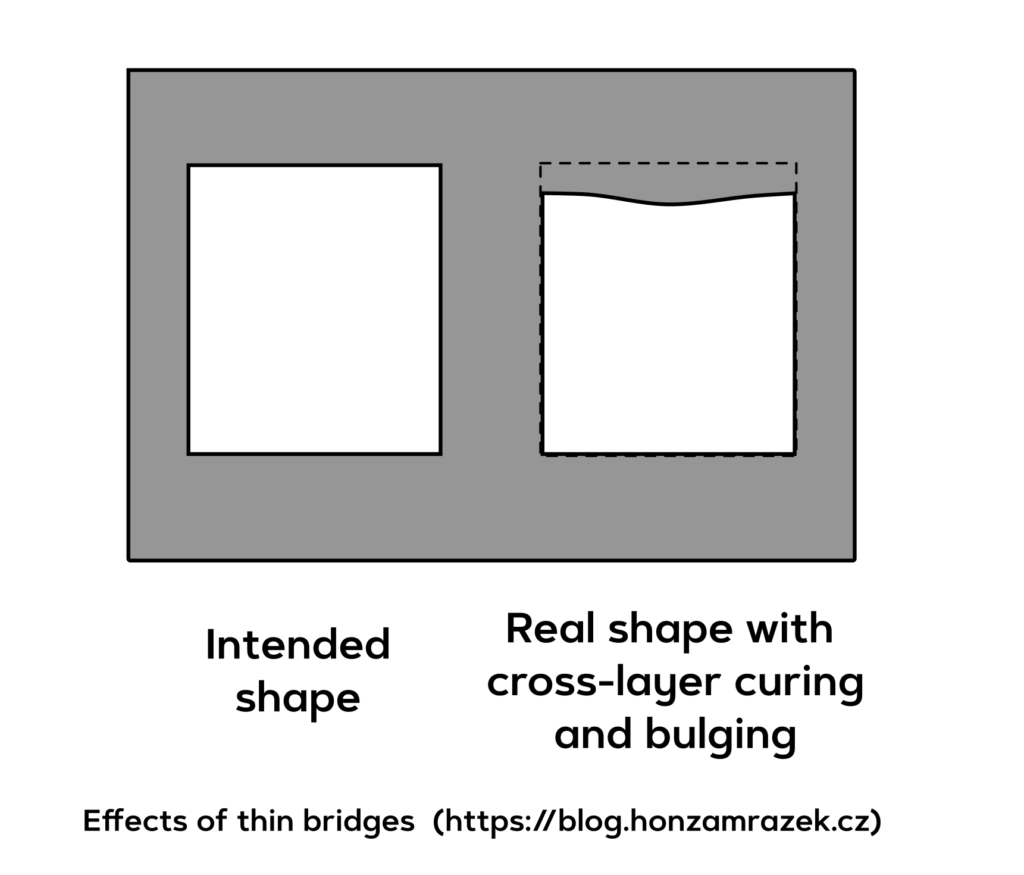
Illustration of bulging
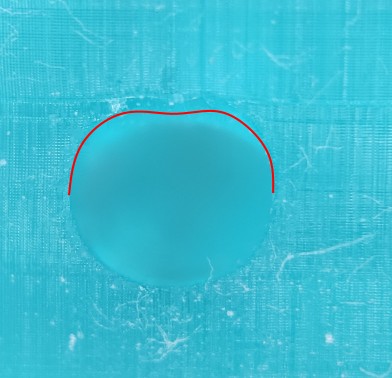
Example of bulging on 3mm hole printed in Siraya Tech Blu
Example of bulging on a large overhanging surface.
On the test model above, you can compare the narrow and wide rectangles’ overhang and see that the wide rectangle has a much larger bulge than the small one, which wasn’t caused by cross-layer curing. On most models and my examples in this post, you will always see a combination of both effects – cross-layer curing and film bulging. Bulging is most notable on horizontal overhangs and bridges. This is why the holes on the example follow the expected deformation caused by cross-layer curing pretty accurately on the sides, but there is a notable bulge in the middle.
When cross-layer curing and bulging causes troubles
When you aim at printing dimensionally accurate objects, the problems of cross-layer curing are clear. First, all overhangs are shifted in the Z-direction, as we saw. The deformations are most notable on horizontal holes often featured on functional prints. Also, if you try to print threads (no matter if internal or external), you probably find out that they are too tight and they don’t fit well. Cross-layer curing also prevents you from printing precisely sharp corners on the overhangs (e.g., tips of threads), as you will always cure more than a single layer thickness.
Also, if there are tiny detail (e.g., a texture) on the overhanging surface, the details won’t be as crisp as there is interference with the layers above. This might be notable on, e.g., minis where not all details might be necessarily lost due to support on the surface per se, but that can be a result of cross-layer curing.
Bulging also reduces dimensional accuracy. Also, as a result of bulging, the layers might not stick properly together, and you will see layer separation or, worse, you will get pockets of trapped uncured resin between bulged layers. All this not only leads to imprecise parts but also it leads to terrible surface quality.
Reducing effects of bulging
The bulging depends on the following factors:
- the thicker the resin is, the bigger bulges are, and most likely, you will have torn layers.
- the longer the overhang is, the bigger bulge you will see. Usually, it is most notable on bridges.
- the more resin sticks to the bottom of the resin tank, the worse the effect is.
- the thinner layers you use, the worse bulging is.
Thick resins such as Siraya Tech Blu suffer from bulging the most; the thinner the resin is (e.g., Siraya Tech Simple), the less pronounced the effect is.
Printing at higher temperatures makes the resin thinner and, thus, easier to squeeze. However, high temperatures also make the cured resin softer. Nevertheless, it seems that having a warm and thinner resin yields better results. But I don’t have any real data on this.
The ultimate solution for bulging is to actually leverage cross-layer curing. We should form the initial layer of the overhang as thick as possible. That is, we print the model normally at desired layer thickness. But we omit any overhanging surfaces. Once we print a couple more layers, we form the overhanging surface in a single, thick layer (basically the maximal layer the used resin allows for) and intentionally overexpose it to make it as strong as possible. This procedure would allow us to print long bridges perfectly. However, the current resin printer controllers are limited and selective curing is impossible.
Reducing effects of cross-layer curing
So what can we do to mitigate cross-layer curing? There are two straightforward means: choosing the right resin and using as low exposure as possible. A resin that blocks more light will cross-cure less. The resins that are generally very easy to print will usually suffer more from cross-layer curing (e.g., transparent resins, Siraya Tech Simple, Blue). Resins with high pigment content usually perform better and have much notable cross-layer curing (e.g., Siraya Tech Fast Navy Gray).
Also, if you manage to get the exposure “just right to stick to the previous layer,” you will mitigate the effects. However, there are two considerable downsides to this. The first one is with resins that don’t block enough, so to actually solidify them, you will obtain notable cross-layer curing. If you have a resin that doesn’t suffer from this, you have to find the exposure in which the newly exposed layer just sticks to the previous one. However, finding the smallest possible time requires experimentation, and once a single variable changes (e.g., temperature), you will start seeing failures in layer delamination.
The other approach is to be aware of cross-layer curing and compensate for it. You could compensate in the model, but that is laborious, and you have to compensate for every resin separately. However, this is what many people do when printing threads – they just offset the thread faces to make the thread loser.
The other approach is to compensate in the slicer/sliced file. Unlike for bulging, compensating for cross-layer curing in current slicers is possible. However, at the moment, I am not aware of a slicer that would offer such a functionality. Therefore, I wrote a UVTools script that allows you to compensate for cross-layer curing.
The script works on the most simple model of cross-curing – offsetting overhanging surfaces in the Z-direction. For most models, it works fine, but it has some limitations that I will explain later. You can get the script from my repository on Github. The script has a single parameter: the number of cross-cured layers. Once you run it, it will offset all overhanging surfaces by this number of layers. This parameter depends on resin, exposure, and temperature. There are a couple of ways to measure it:
- use Experiment 1 from this blog post.
- use the test piece I provided above and measure the polygons. They are designed to be 15 mm. Multiple shapes are provided so you can remove a single measurement error. However, you don’t want to measure the vertical distance; instead, you want to choose one of the non-vertical edges of the polygon. Why? The horizontal edges suffer from bulging. When you take the measurement, you simply compensate for the angle by dividing it by a cosine of the edge angle.
- or you can use the graphical indicators of the Engineering torture piece I present below in the text.
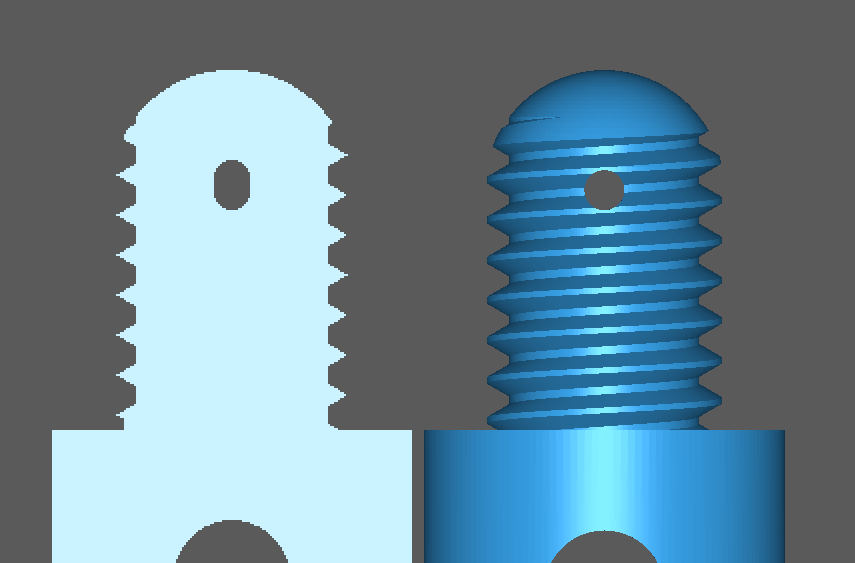
The typical amount of cross-curing is between 50-500 µm, in my experience. Note that the amount of cross-curing also defines the smallest possible thickness of the model in the Z-direction. To illustrate what the script does to a model, see the images below of a thread with a hole inside.
At the moment, the method above has two limitations:
- it doesn’t work well with anti-aliasing (basically, you lose it on the overhanging surfaces)
- and it cannot deal with light scatter traps (explained below).
When you print a thread without compensation, the following will happen:
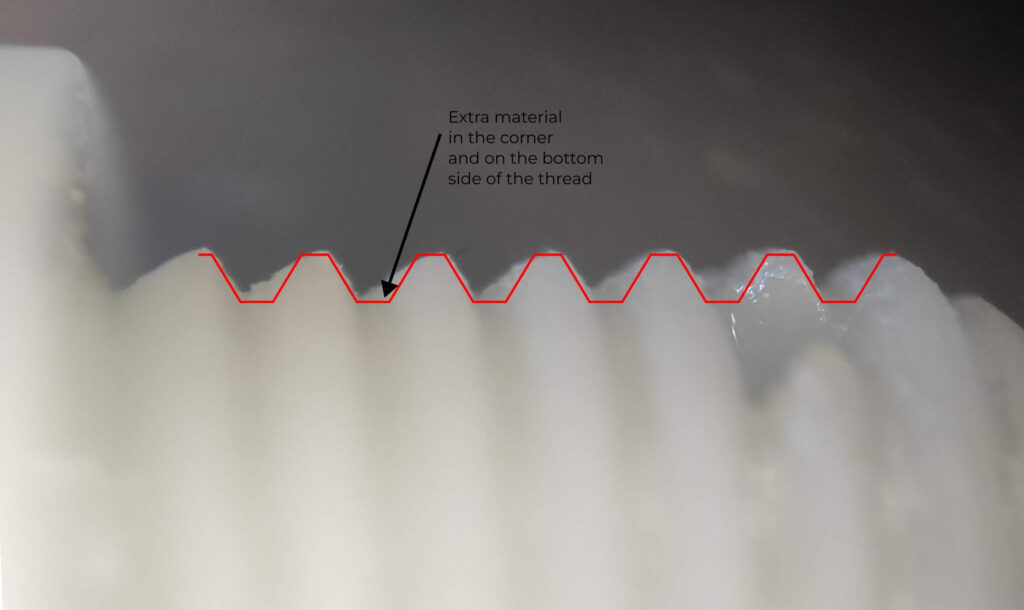
The internal corners get filled with cured resin. My working theory for this phenomenon is that the UV light scatters from the already printed model and causes cross-pixel curing. I’ve already seen this effect with Siraya Tech Fast Mecha. It seems that this happens for all resins, but the effect isn’t as strong, and therefore, it is only notable in small internal corners of the model. The exception is Siraya Tech Fast Blu, which suffers greatly from this. At the moment, the script I present doesn’t compensate for it. However, since it pushes walls apart in threads, it helps to some extent (see the image below). However, there is no compensation for sharp inner overhangs implemented. For most decently pigmented resins, this is enough. However, for resins such as Blu, the effect of scattering is still observable
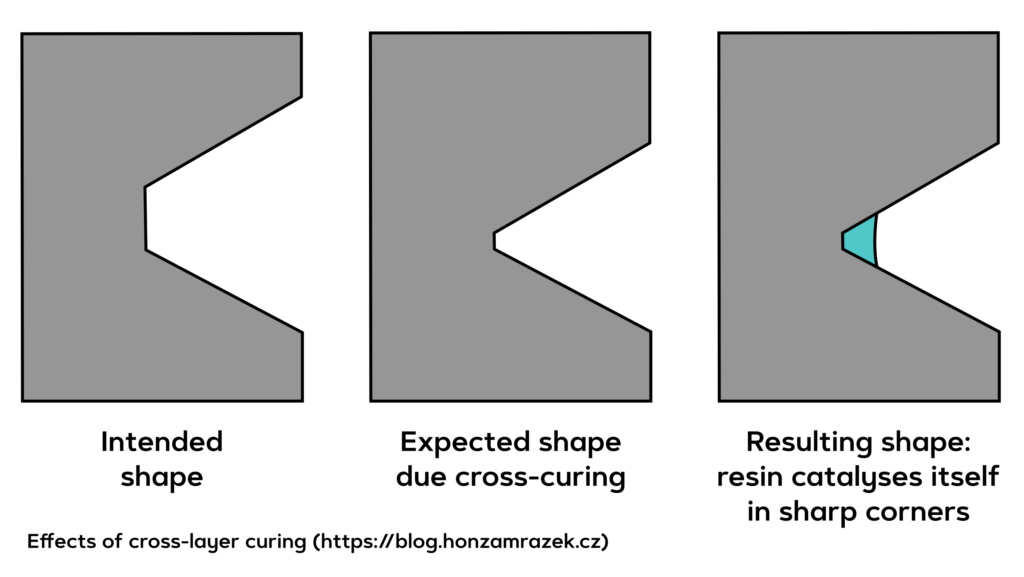
Illustration of cross-layer light scatterring
Example of compensated Blu: left one is without compensation, right one is with compensation. You can see that the overhans are much better with compensation and all lines are printed. However, since Blu is thick, bulging is more notable.
What about cross-layer curing compensation in UVTools?
Note that there is a cross-layer curing compensation in UVTools that works differently. It dims voxels that have voxels above them. The goal is to ensure that every voxel receives the same dose of UV light. However, this doesn’t affect the dimensional precision of the model as this procedure cannot remove voxels on the overhanging areas.
Showcase: Test how well you can compensate – Engineering Torture Piece for Resin Printers
There are a lot of test and torture pieces for resin printers. Most of them are, however, evaluated only visually, and the goal is to get “a nice model with all the thin hairs,” but nobody cares how the model is dimensionally accurate. I have introduced a test model that allows you to measure resin shrinkage and cross-pixel curing.
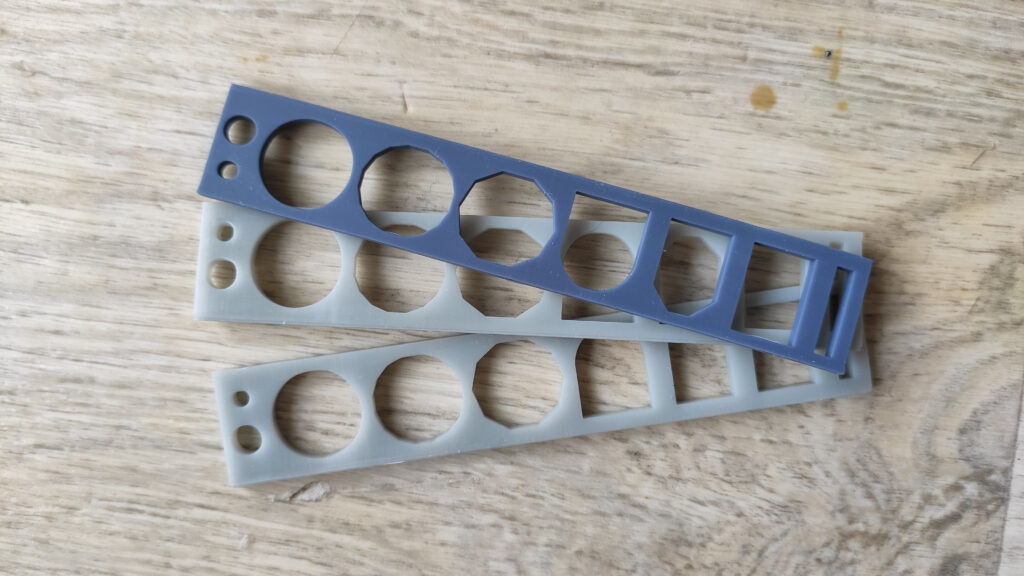
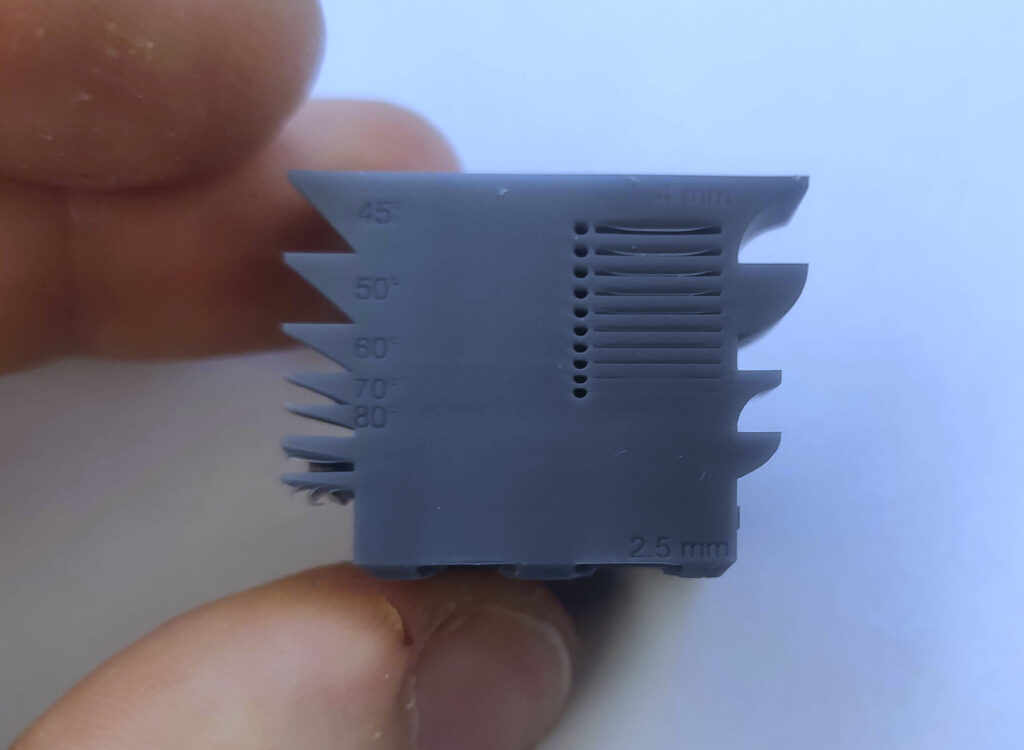
To properly benchmark how well you can print engineering models, I prepared Engineering torture pieces. These models are bricks with metric holes and metric threaded holes. All holes are present in vertical, 45°, and horizontal orientations. There are holes from M2 to M8. The threads already have modeled G6 tolerance, so if you print them accurately, the standard metric screws should fit in smoothly. The models are available on Printables.com, and you can see a preview of one of them below:
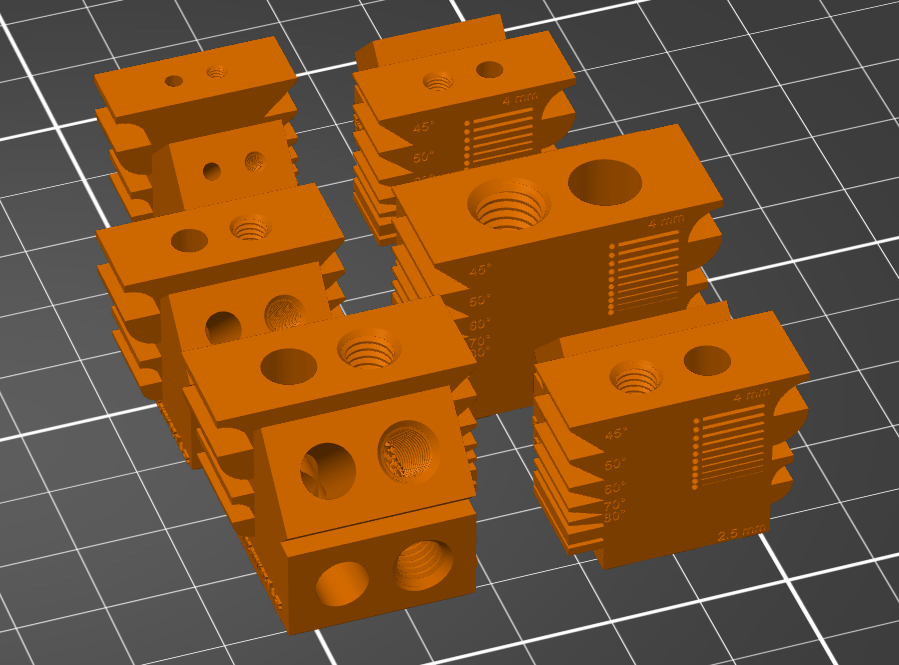
Besides the holes, there are two types of overhangs – flat ones and circular ones — under various angles. On the back side, there is a list of narrow openings that you can use to visually identify how much your resin cross-layer cures.
In my experience, the following steps are needed to print the torture pieces successfully and accurately:
- choose a suitable resin,
- compensate for resin shrinkage and cross-pixel bleeding,
- compensate from cross-layer curing,
- be sure to use long enough rest times to prevent blooming.
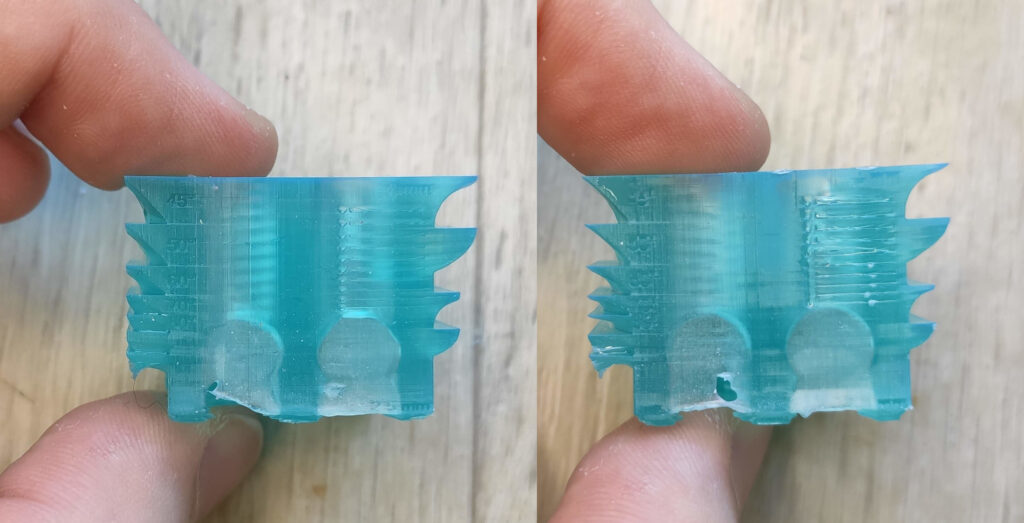
To show the effectiveness of my method, I printed the torture pieces out of Siraya Tech Blu. This resin suffers a lot from cross-layer curing, and also, as it is quite thick, it suffers a lot from bulging. Note that this is a pity, as Blu has good mechanical properties for functional components.
Without the compensations, you are unable to fit the screw into the holes, and you cannot screw it into the threads. With the compensation, the screw fits perfectly into the vertical and 45° thread. However, it doesn’t fit into the horizontal threaded hole as there are notable effects of bulging. As we discussed, I don’t have implemented bulging compensation. The left sample is without compensation, the right one is with compensation:
However, for Siraya Tech Fast Navy Gray and Siraya Tech Simple Smokey Black, I am able to print fully functional horizontal threads as they don’t suffer from bulging that much. Also, note that the overhangs have much better quality and are not fused together on the compensated model.
Conclusion
What was presented was the only initial introduction to the problem of cross-layer curing. We presented a simple method for compensating for it. In practice, it seems to work well on most models. However, we need a better model and understanding to compensate for light scatter in the internal corners. Also, what we cannot mitigate in software due to limitations in the current printer firmware is the problem of bulging on the overhangs.
Another approach to overcoming bulging is developing a fundamentally different resin printer arrangement that wouldn’t produce so much stress on the single-layer-thick film. Note that peeling the layer isn’t the main issue here, but sinking is.
If you have ideas on improving the compensation, please, let me know in the comments!
Recent news: My open letter to the 3D-printing community
I love the 3D-printing community, but I think there is room for improvement. Let's get better in 2023! Read the full letter.
Support my work!
If you like my work (these blog posts, my software and CAD models) and you would like to see more posts on various topics coming, consider supporting me in various ways:
- You can become my sponsor on Github.
- If you prefer, you can also become my Patreon.
- You can buy me a coffee on Ko-fi,
- or you can buy something from my Tindie store (also see below),
- Or you can just share my work!
If you are interested in knowing what I am up to and recent sneak-peaks, consider following me on social media (Twitter, Instagram, Facebook).
My store offers
I launched new tank cleaning kits for Elegoo Saturn, Saturn S, Mars 1, and Mars 3. You can find them in my store.
Related Posts
- Multi-planar Slicing for 3D Printers – For Both FDM and Resin
- Open letter to the 3D printing community: Let’s be better in 2023! What should we do?
- Continuous Printing On LCD Resin Printer: No More Wasted Time On Peeling? Is it possible?
- About the Successful Quest For Perfect MSLA Printer UV Backlight
Excellent article. I have been dealing with this exact issue, particularly on small (1-3mm holes) in Siray-Tech Blu Emerald and Nylon Black.
This has forced me to design holes that can be reamed/drilled out by hand, which is labor intensive and has its limitations (like blind holes or stepped bores).
I have not tried printing any threads yet, but this is likely to happen in the next couple of months.
Keep up the good work.
– John
It is very much a trivial matter to determine the exposure time needed to achieve a certain layer height but is less than straightforward forward to determine the exposure time to achieve proper interlayer adhesion. If one has access to a tensile machine through a university or maker space, then it is possible to determine with laborious efforts.
To be lazy, once an exposure plot has been determined, a reasonable assumption is to use the time required to grow a layer to a height of 110-120% of the target thickness.
I wonder if the internal corner issue is also effected by the capillary action of more viscous resins (like Siraya Blu). It’d be interesting to see if there was an experiment or test piece you could devise to test this.
To add your library of engineering dimensional test models, I’ve created one to help calibrate dimensional accuracy for the z-height when printing directly on the build plate (https://www.thingiverse.com/thing:5329416).
Great work as always!
Hello,
I am fascinated by your work and have read most of your blog. I would like to test your cross-layer curing script but am having an issue with this dependency.
(12,17): error CS0234: The type or namespace name ‘Toolkit’ does not exist in the namespace ‘Microsoft’ (are you missing an assembly reference?)
I have install the reference using the CLI version of nuget but this didn’t help and I am missing something. How do I make this script work in UVTools? I’m sorry, this is probably a rookie question.
Thank you in advance.
The script should be corrected now.
I have a Qs, do you have to put this file in the “terminal” option, I did this but the program put me this
“(9,1): error CS7021: No se puede declarar un espacio de nombres en el código del script”
“(9,1): error CS7021: Cannot declare a namespace in script code”
Pls Help
Thanks!!
Thank you for offering the holy grail of LCD resin printing. I have not looked into the format of CTBv4 files, but I would hope at some point it would be possible to have multiple masking layer outputs and just have them expose in a particular sequence without moving the build plate. For bulging, in my head since the issue is the flexible layer being unable to return to a flat position, that the compensation would be to cure based on where it deforms as it sinks into the resin… but that sounds like a nightmare of testing and calculation. The overhang flexes toward the build surface at the extremities and we need it to be pulled back down towards the FEP. Im going to have to read through this several times and try out the torture tests to understand better. It was driving me crazy printing a model tank that had the most peculiar small deformations.
Hi James,
“but I would hope at some point it would be possible to have multiple masking layer outputs and just have them expose in a particular sequence without moving the build plate.”
I never had nor used any Chi-Tu printers at all, only Nova3D printers and Uniz IBEE, but this is definitely possible in UV Tools using “multiple exposures”, it’s VERY useful.
Hi Jan,
I’ve just found your blog an wanted to say THANK YOU! This post is amazing, i’ve been looking for this for a long time and honnestly getting me frustrated for a few weeks now why I was getting a lot of bulging artefacts at the bottom of my supports on my printer at home. I have an Anycubic Photon M3 and at work we have an SL1S, I noticed the SL1S had almost no bulging at the bottom. I can print a flat plate with very many thin supports at a 3 degree angle with no problems. The Photon M3 can very much not do that. The same file will even fuse the support pillars together. (Also using the same resin BTW).
My theory now is that the tilting mechanism on the SL1S flushes the partially cured resin away and causes inhibitors in the resin to do their work better.
At first I was blaming the uneven lighting on my Photon M3 since the light array has way less even exposure than the SL1S but i’m not so sure anymore now. You also have a post on compensating the uneven exposure on a resin printer, curious to hear your thoughts on this. (I was experiencing some ghosting type artefacts on my M3 it was probably unrelated)
I’m now thinking of making a sort of stirring mechanism for my printer. A little steel bar at the bottom of my resin vat that I can move across the resin after each layer to stirr it a little. (magnetic steel so I can use a magnet under the vat and move the magnet with a linear axis)
(Feel free to steal this idea if you like it since I will probably not come to work on that for a few months if at all)
Hello Jan
Thank you very much for this!
I am now starting my journey in resin 3D printing for creation of electrochemical cells for laboratory use. So far I was using mostly FDM printers and already realized that the resin world is so much different.
You’re doing a great work making resin printers useful for functional printing and understanding its flaws.
I’m looking forward for more posts like this one!
The script is broken once again.
(52,49): error CS1061: ‘Mat’ does not contain a definition for ‘NewBlank’ and no accessible extension method ‘NewBlank’ accepting a first argument of type ‘Mat’ could be found (are you missing a using directive or an assembly reference?)
Any chance this could be fixed?
Thanks
ig
ig, the script still works on uvtools version 4.2 and later. I have had to stay at this revision to use the script on my older machines. I would love to have Jan revise the script to be compatible with new versions of uvtools but that may be a lot to ask.
Update from GitHub:
“You can replace NewBlank with NewZeros” I’ve replaced this in the script and it now works.
https://github.com/yaqwsx/UVToolsScripts/issues/7
I have a Qs, do you have to put this file in the “terminal” option, I did this but the program put me this
“(9,1): error CS7021: No se puede declarar un espacio de nombres en el código del script”
“(9,1): error CS7021: Cannot declare a namespace in script code”
Pls Help
Thanks!!
Thanks for the article.
I have some painfully learned observations to share.
Uncured prints permanently change dimensions with solvent cleaning. This is hard to observe on most prints but when I print 2 and 3 pixel thick walls, the cleaning solvent swelling happens fast in under 20 seconds. Easy to measure the wall thickness change using a digital vernier vs many slicing variables and cleaning methods. I tested many solvents from Xylene to Methyl hydrate. Ultrasonic tank, dip cleaning etc. The more aggressive the solvent and cleaning method the shorter the total solvent contact time but… A couple of liters of resin later I concluded the cleaner the final print surface the greater the final swelling distortion and the solvent used does not make a significant difference. On the other hand, fully cured prints do not swell even after days immersed in Xylene.
I have also observed the resin changes from a liquid to a jelly state and then to a solid. Mathematically the UV exposure exponentially attenuates as the light travels through the liquid. Within every layer is frozen an exponential varying artifact in curing and hardness, the maximum value beginning created touching the PTFE film. Slicing in thinner layers produces less exposure variation within the layers. The total UV LED on time for a print can be reduced as the total printing time increases.
My approach to print accuracy is currently having the print rising out of the resin as close to fully post curried as possible and using a sharp tap if needed.
Just some food for thought
Cheers-Peter
Hi Jan,
Indeed, again a great job! I really appreciate your articles, especially the one about shrinkage & bleeding compensation.
I found this topic yesterday and I am on my way to print ‘torture tests’ today 😊
But there is one point that I don’t understand:
While printing, it is light coming from curing of new overhanging layers (higher index) that increases thickness of previously printed layers (lower index)?
So, if I am right, then the correction script should remove some of the “previously printed” layers not some of the hanging ones?
In the images of the thread with a hole, if the building plate is on the image’s bottom (light coming from the top) then you should obtain a round hole but displaced toward the screw’s tip?
Regards,