3D printing is a pretty effortless process of manufacturing. However, it takes time. So when we talk about improving 3D printing, besides enhancing the quality and dimensional accuracy, it makes sense to improve the print time.
Back in the old days, when printers used RGB screens and tiny displays, the main limiting factor was the resin exposure itself. However, with the rise of monochromatic large-format displays, the exposure itself is nearly negligible in the whole printing process. There are two reasons for that – first is that the LCD is more transparent. Therefore, the exposure now takes between 1.5–3 seconds compared to 8-12 seconds for the old printers. However, the peeling process prolonged from 2-3 seconds to often 5-20 seconds. The reason for that is mainly the large print area where three effects are playing against us: the resin viscosity that makes it harder to squeeze it into a layer, larger FEP films deforming more before they release from the newly cured resin (so we have to lift higher) and also, we need a longer time for the resin to flow in to fill the void after the previous layer. Therefore, even though the exposure is nearly 4 times as fast, the printers are at most 2× faster. With some heavy tuning, my old Mars can print the fastest of all my machines. The exposure is dialed down by massive power, and the rigid construction and small area require only a 2mm lift distance to successfully peel.
We gain negligible speed improvement even if we reduce exposure to half on modern printers. Instead, we should focus on speeding up layer peeling. Imagine the speed improvement if we managed to eliminate the peeling completely! We could achieve a print speed of up to 100 mm per hour with 50µm layers! If you are interested, you can join me on the journey to achieving continuous printing on a consumer-grade resin printer that I persuaded nearly a year ago.
How to achieve continuous resin printing
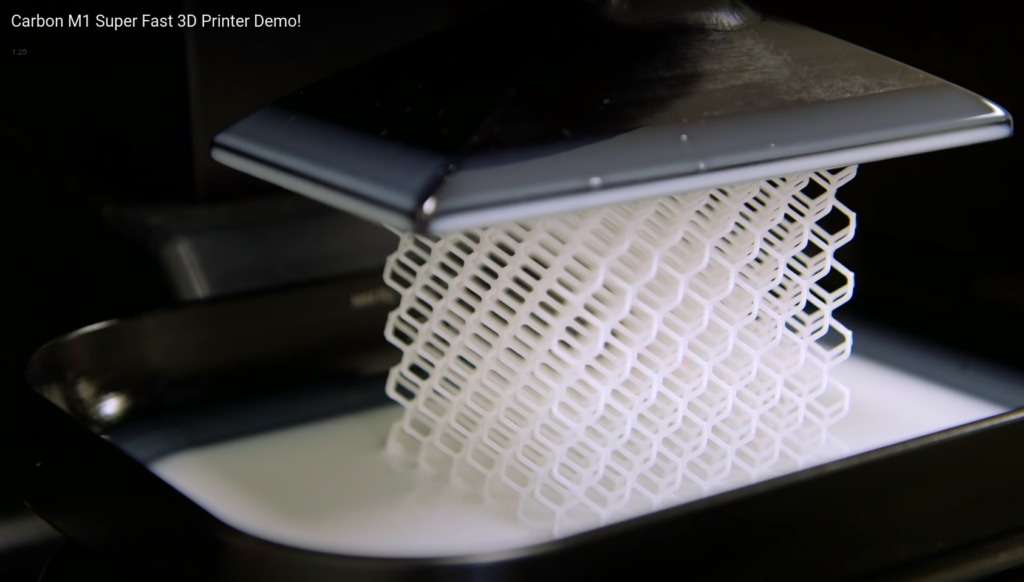
Continuous resin printing isn’t particularly new; there are the DLP printers by Carbon and many scientific papers (unfortunately, most of them are behind a paywall, so I don’t link them). Recently, Chinese company Carima introduced their line of continuous resin printers. All these printers can print really fast. There is also Hitry Rocker 1 and many industrial resin printers that use deep resin tanks to cure the tank’s surface and sink the model into the resin to avoid peeling.
Carbon printers use a patented “continuous liquid interface production” (CLIP). The bottom of the resin tank is transparent and also permeable to oxygen. As we learned in many past blog posts, UV resin doesn’t cure when oxygen is present (this is why stains from resin remain sticky and why some people cure under-water or under glycerol). When the bottom of the tank is saturated with oxygen, a thin layer of resin in contact with the oxygen never hardens and forms a “dead zone.” Therefore, the model never sticks to the bottom of the resin tank, and you can continuously pull up without peeling cycles. However, to properly refresh the oxygen layer, you need access to the bottom of the resin tank. Therefore these printers use a DLP projector.
The Carima printers, on the other hand, use resin tanks similar to what we know from consumer-grade printers. However, they use (at least for me) unknown film that yields very low peeling force; thus, it doesn’t need the peeling cycle. They don’t seem to use oxygen inhibition at all.
Scientific papers also show that you can achieve continuous printing with a thin liquid oil interface on the bottom of the tan or by electrowetting. Nevertheless, all these approaches struggle with two problems:
- Resin curing produces heat, and you have to be able to cool down the resin (which is even harder when there is no peel cycle),
- And since you don’t lift the printed model more than by a single layer, you struggle with resin replenishment under the model.
This is why you always see fast demos on thin lattice structures with minimal cross-section and plenty of free space. You don’t produce much heat with such models, and it is easy to replenish the resin under the model as the model has a small radius (distances from the perimeter into the middle of the area).