Almost all modern 3D printers, whether they use FDM or resin technology, work by creating thin layers of material and stacking them on top of each other to build a model. These layers are created by slicing the input model into horizontal, parallel planes, a process known as planar slicing. This method has several benefits, including simplicity in printer construction and a lack of collision concerns during the slicing process. FDM printers only need three axes of motion to build models using planar slicing, while resin printers only require one axis. While planar slicing has come a long way and has been greatly improved over the years, thanks in part to software such as Cura and Prusa Slicer, it does have some limitations, particularly when it comes to printing overhangs.
This is why people have proposed various non-planar slicing techniques to overcome these issues. These techniques pop-up more and more in the community. There are concepts of 5-axis 3D printers (such as Open 5x). However, we struggle with slicing that would unleash the full potential of such machines. People are experimenting with hand-crafted G-codes (such as those by FullControl XYZ) or with using cones or free path as the slicing geometry, for example. While these methods show promise, they still require a lot of development before they are ready for widespread use.
In this blog post, I would like to introduce (at least I hope) a new technique called “multi-planar slicing” as a possible solution to the limitations of traditional planar slicing. This method can be used with both resin and FDM 3D printers and has the potential to enable support-less resin printing of complex geometries. While this is just a concept at the moment and has not yet been implemented, I believe it could be a simpler alternative to other non-planar slicing techniques. Before diving into the implementation, however, I want to hear your thoughts on this idea.
I’ve been in the 3D printing community for a couple of years. I watch both FMD and resin printing communities closely, and I try to actively participate. I like 3D printing – it is an exciting technology opening new possibilities, and it is a nice cross-over between mechanical-, electrical engineering, and computer science. There is still a lot to explore, improve and develop. But technology is improving every day, and most makers can contribute to the improvement. And what’s great is that nearly anyone can contribute towards the progress of the field, as 3D printing benefits a lot from open-source and open-hardware projects.
However, over the last few years, I started to note a few things that bother me a lot about the community, and I think they are holding the whole community and industry back. I believe that the beginning of a new year (2023) could be the right time to share my views and opinions, as it is the time when people make new-year resolutions.
I encourage you to read this, think about it, and reflect on your activity in the community. We, as a community, can do better! Also, if you disagree with me, I will be happy if you leave a comment below and explain your opinion. I would like to know how the community thinks and perceives itself. If you like and share my opinion, consider sharing this blog post on social media and with other members of the 3D-printing community so we can actually make a change!
3D printing is a pretty effortless process of manufacturing. However, it takes time. So when we talk about improving 3D printing, besides enhancing the quality and dimensional accuracy, it makes sense to improve the print time.
Back in the old days, when printers used RGB screens and tiny displays, the main limiting factor was the resin exposure itself. However, with the rise of monochromatic large-format displays, the exposure itself is nearly negligible in the whole printing process. There are two reasons for that – first is that the LCD is more transparent. Therefore, the exposure now takes between 1.5–3 seconds compared to 8-12 seconds for the old printers. However, the peeling process prolonged from 2-3 seconds to often 5-20 seconds. The reason for that is mainly the large print area where three effects are playing against us: the resin viscosity that makes it harder to squeeze it into a layer, larger FEP films deforming more before they release from the newly cured resin (so we have to lift higher) and also, we need a longer time for the resin to flow in to fill the void after the previous layer. Therefore, even though the exposure is nearly 4 times as fast, the printers are at most 2× faster. With some heavy tuning, my old Mars can print the fastest of all my machines. The exposure is dialed down by massive power, and the rigid construction and small area require only a 2mm lift distance to successfully peel.
We gain negligible speed improvement even if we reduce exposure to half on modern printers. Instead, we should focus on speeding up layer peeling. Imagine the speed improvement if we managed to eliminate the peeling completely! We could achieve a print speed of up to 100 mm per hour with 50µm layers! If you are interested, you can join me on the journey to achieving continuous printing on a consumer-grade resin printer that I persuaded nearly a year ago.
How to achieve continuous resin printing
Continuous resin printing isn’t particularly new; there are the DLP printers by Carbon and many scientific papers (unfortunately, most of them are behind a paywall, so I don’t link them). Recently, Chinese company Carima introduced their line of continuous resin printers. All these printers can print really fast. There is also Hitry Rocker 1 and many industrial resin printers that use deep resin tanks to cure the tank’s surface and sink the model into the resin to avoid peeling.
Carbon printers use a patented “continuous liquid interface production” (CLIP). The bottom of the resin tank is transparent and also permeable to oxygen. As we learned in many past blog posts, UV resin doesn’t cure when oxygen is present (this is why stains from resin remain sticky and why some people cure under-water or under glycerol). When the bottom of the tank is saturated with oxygen, a thin layer of resin in contact with the oxygen never hardens and forms a “dead zone.” Therefore, the model never sticks to the bottom of the resin tank, and you can continuously pull up without peeling cycles. However, to properly refresh the oxygen layer, you need access to the bottom of the resin tank. Therefore these printers use a DLP projector.
The Carima printers, on the other hand, use resin tanks similar to what we know from consumer-grade printers. However, they use (at least for me) unknown film that yields very low peeling force; thus, it doesn’t need the peeling cycle. They don’t seem to use oxygen inhibition at all.
Scientific papers also show that you can achieve continuous printing with a thin liquid oil interface on the bottom of the tan or by electrowetting. Nevertheless, all these approaches struggle with two problems:
Resin curing produces heat, and you have to be able to cool down the resin (which is even harder when there is no peel cycle),
And since you don’t lift the printed model more than by a single layer, you struggle with resin replenishment under the model.
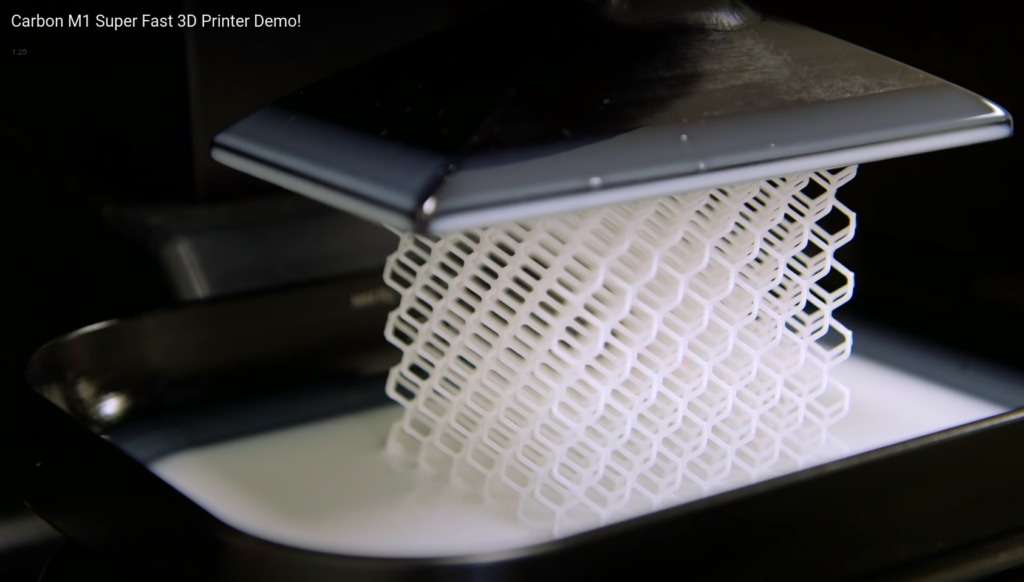
This is why you always see fast demos on thin lattice structures with minimal cross-section and plenty of free space. You don’t produce much heat with such models, and it is easy to replenish the resin under the model as the model has a small radius (distances from the perimeter into the middle of the area).
The M in the name “MSLA resin printer” stands for “masked.” These printers use either an LCD or DLP chip to mask the UV light to create a pattern for the layers. UV light is often created by LED diodes. When you look at the portfolio of resin printers, the manufacturers bring new and new arrangements of LED diodes and corresponding optics. They use claims like “99% percent uniform backlight” and “even more parallel rays” in their marketing materials.
This makes one wonder – are these claims factual or just marketing? Which light source is the best? And should I even care? Can I see the backlight quality on the quality of my prints? Let’s find out.
In this blog post, I will show you how you can measure the quality of the backlight using two open-hardware and open-source measurement jigs I designed (called DrLCD). We will also use these measurements for compensating some of the imperfections via building LCD compensation masks. We also discover how much a backlight can affect your print quality and precision. You will also learn how you can use DrLCD for measuring the health of your LCD display, and we put some measurements behind the question you see on the Facebook groups often: “how long do the LCD displays on a resin printer last?”
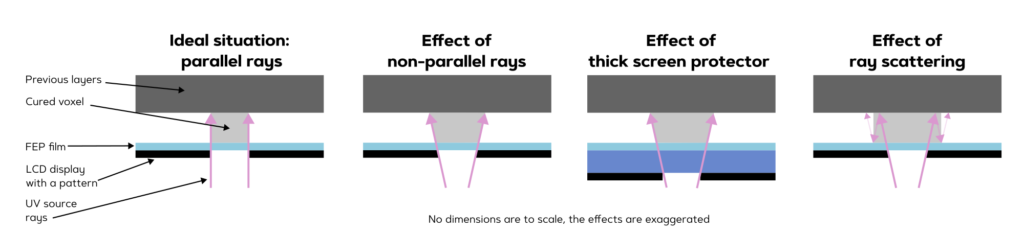
Theory 101: What is the ideal backlight?
For simplicity, I will focus here only on LCD printers. They are also more widespread compared to DLP printers. The same challenges, however, apply also to DLP printers. They just have a slightly different optical arrangement, and the optical defects come from other parts of the optical chain.
Let’s look at the ideal case from the following image:
If you read my blog regularly, you might know that I try to push the accuracy of resin printing as much as possible, as I use resin printing for functional parts. We have already explored resin shrinkage, warping, blooming (part one and part two), and we also briefly touched on how temperature affects precision. However, I haven’t covered one of the most notable problems – cross-layer curing.
When you have geometry without overhangs, you don’t have to care. However, in practice, some overhangs are often necessary. In this post, we won’t look at techniques to avoid overhangs, and we will also not deal with overhangs that need to be supported. We will focus on the overhangs that are nicely printable – e.g., steep ones or such that cannot be supported, e.g., metric threads. Yes, you can actually print functional M3 threads right out of the printer. If you use the right resin and give the trial-and-error approach a chance, you can also get somewhat functional M2 treads.
How is a layer formed, and what is cross-layer curing
To fully understand the problem of dimensional inaccuracy caused by cross-layer curing, we first must understand how a layer in an LCD resin printer is formed. The general idea is – I hope – clear. A build plate sinks into the resin tank so that a thin layer of resin is between the resin tank film and the already printed part of the model. The LCD exposes this thin layer of resin to UV light and cures the resin. See the image below:
How a layer is formed and how cross-curing happens
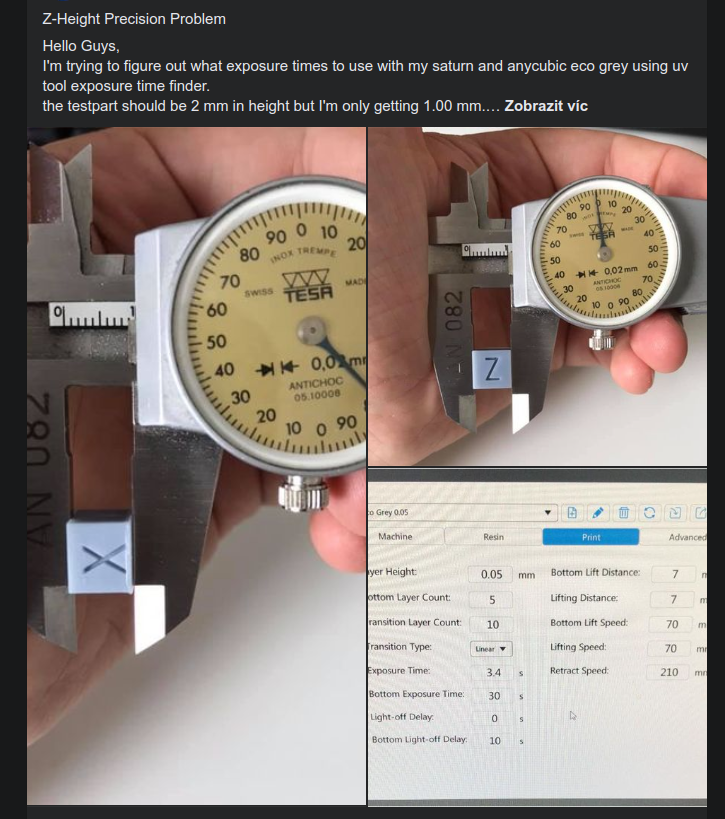
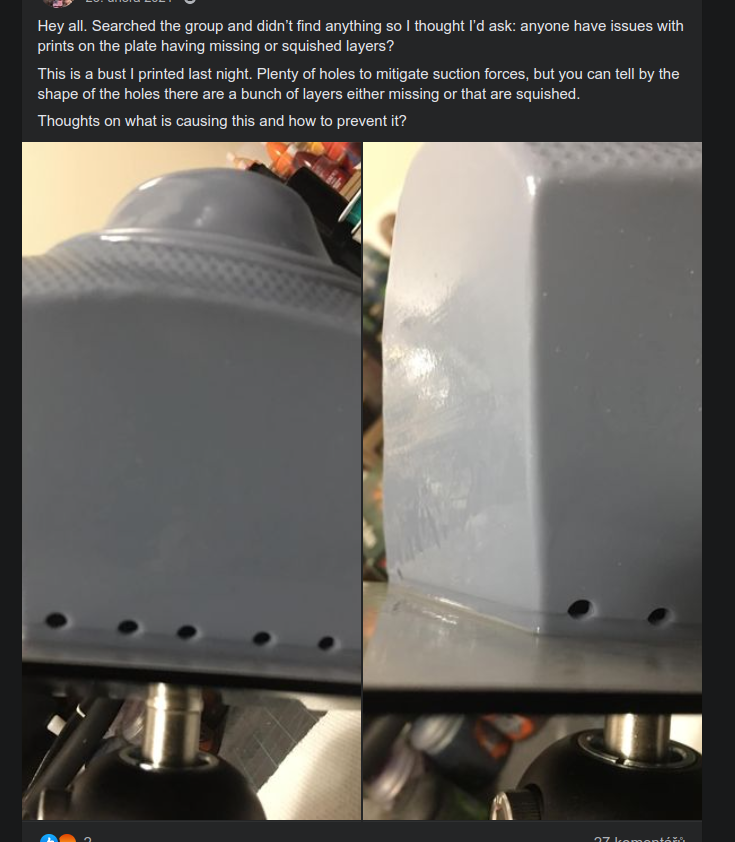
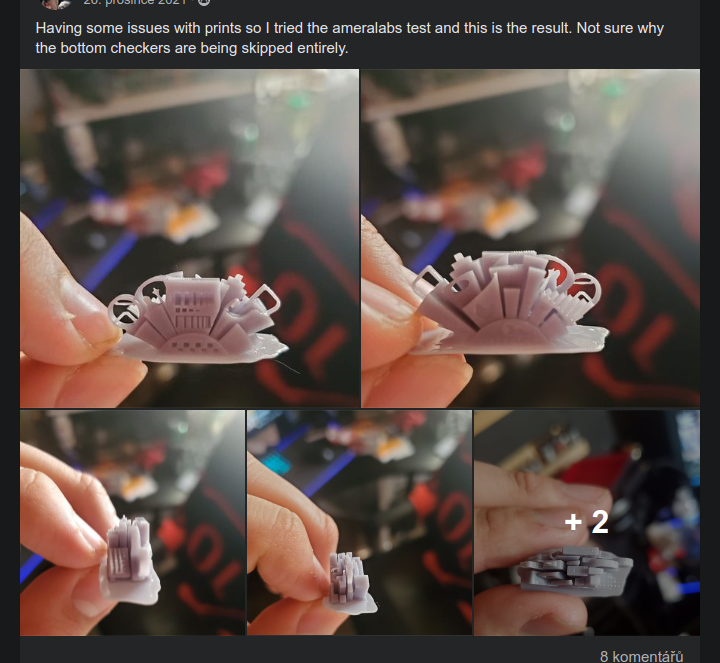
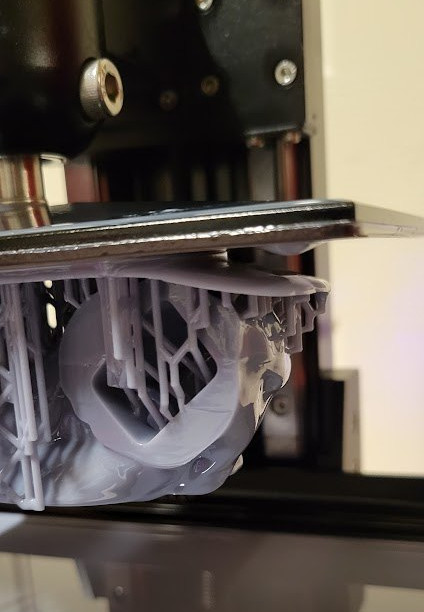
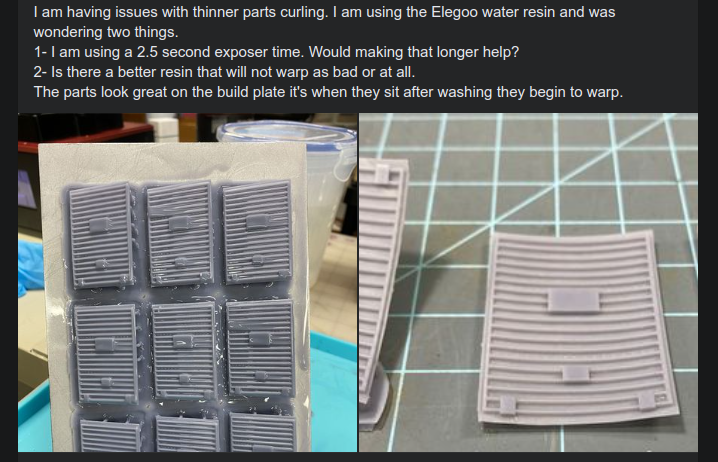
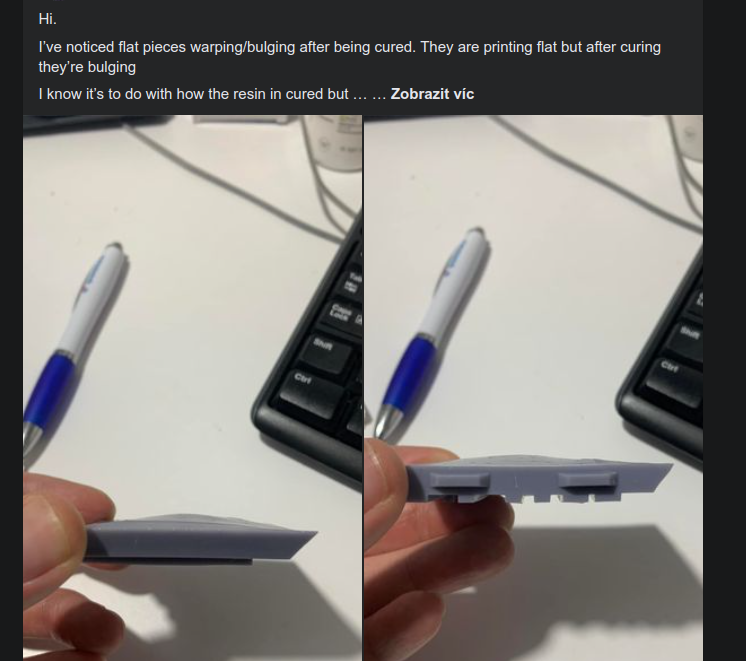
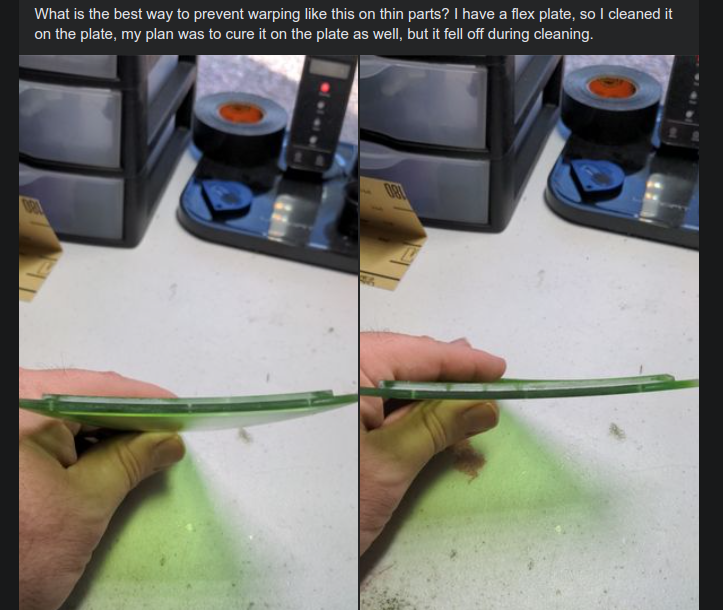
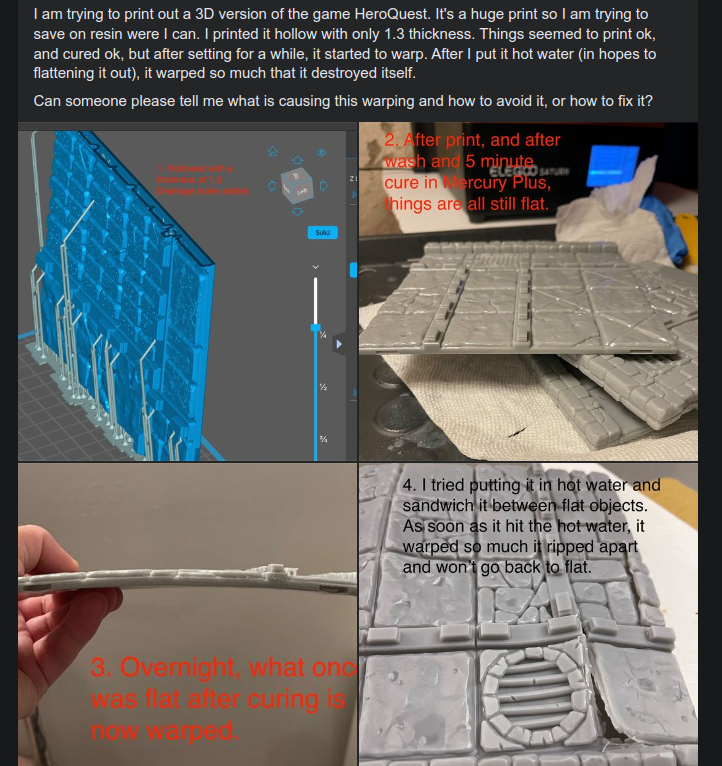
The summer is over, and winter is near in the northern hemisphere. What does it mean? The resin printing groups are getting full of questions regarding suddenly failed prints. Why is it so? What can you do to prevent the failures? Note that you should continue reading even if it is not cold outside but you experience print failures. In this post, I will summarize all my findings on various ways a resin print can fail and tell you what you can do about it. The advice I present is no random guess; it is formed from many experiments, and all of them are supported by data (you can read all my other posts that explain the topic in depth).
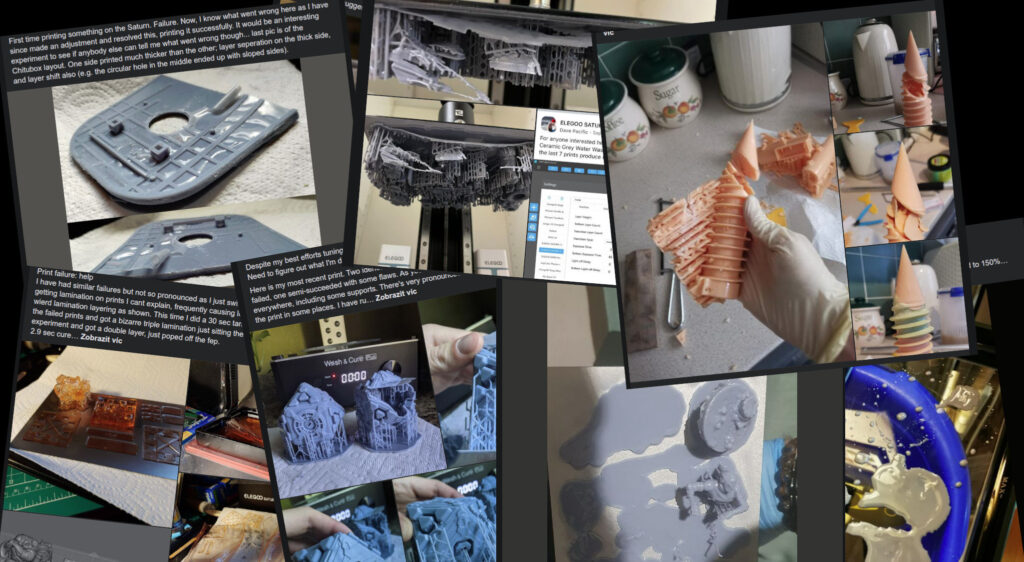
An example of all the problems shared in the FB groups. It is really not hard to find them.
I know this isn’t a flashy TikTok/Youtube video, and reading this post will take you about 15 minutes. But trust me, I think reading this thoroughly can save a lot of headaches, time, and money in the resin wasted on failed prints.
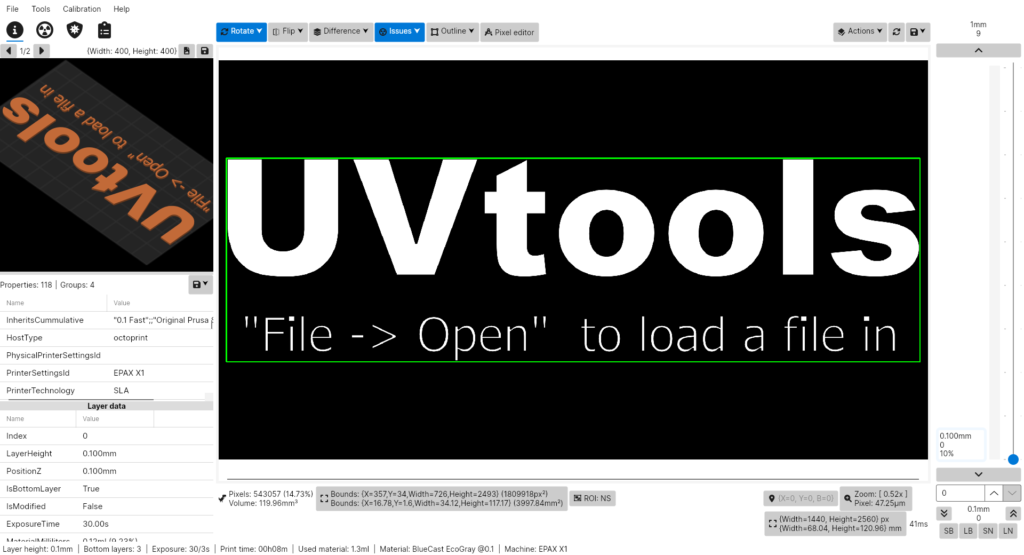
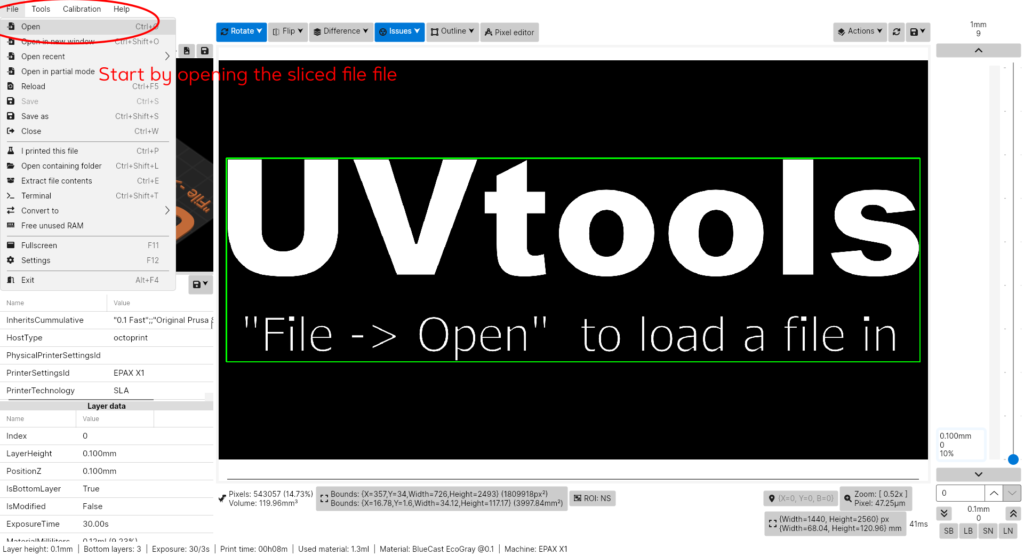
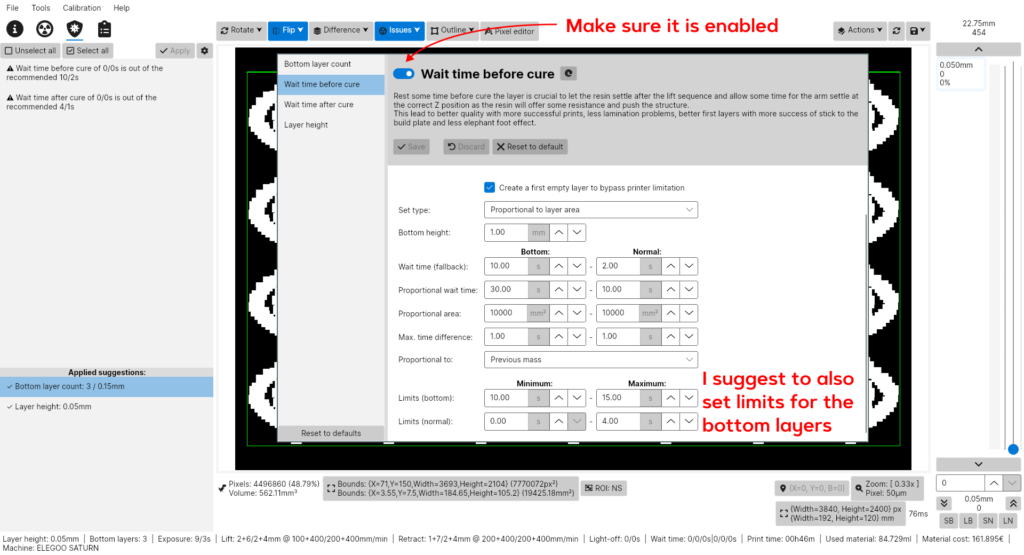
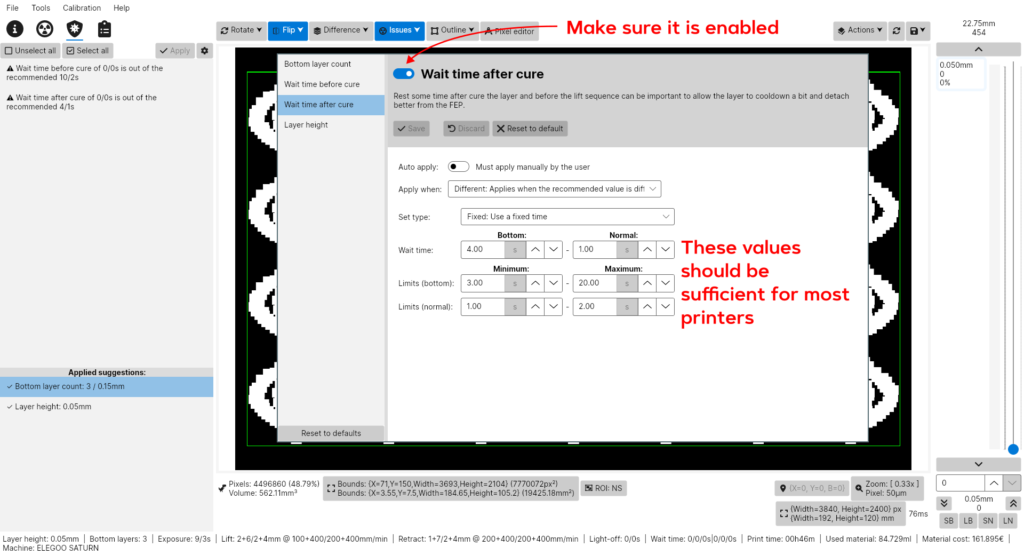
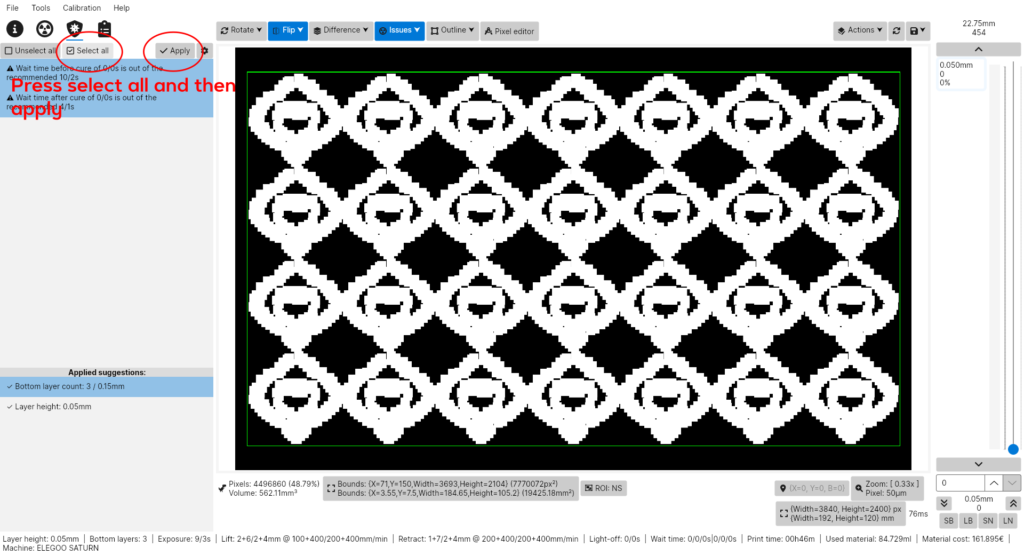
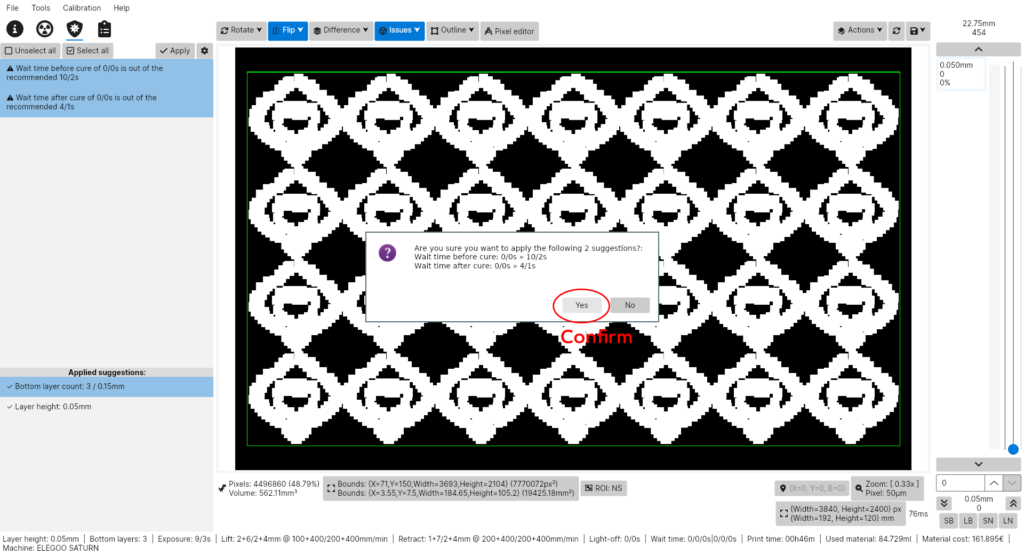
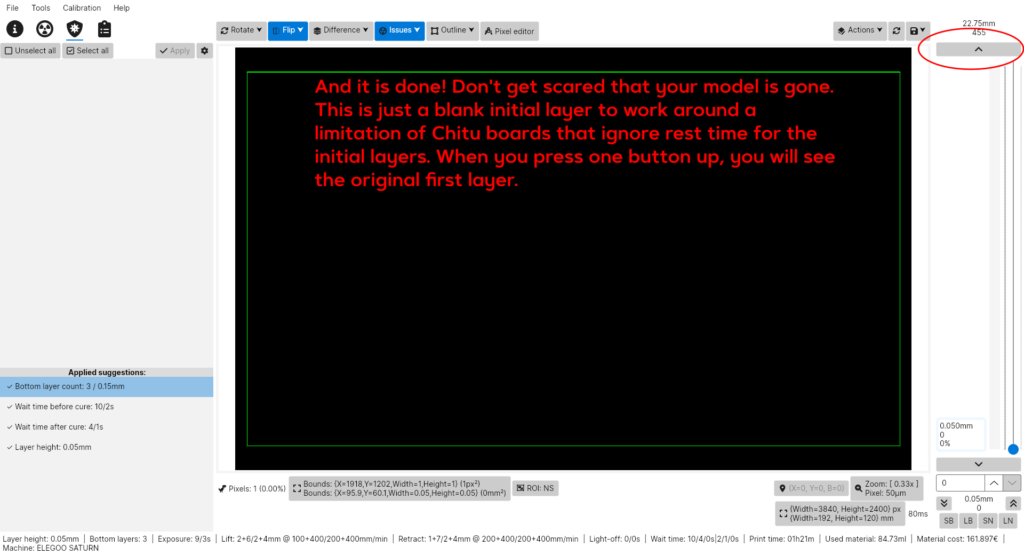
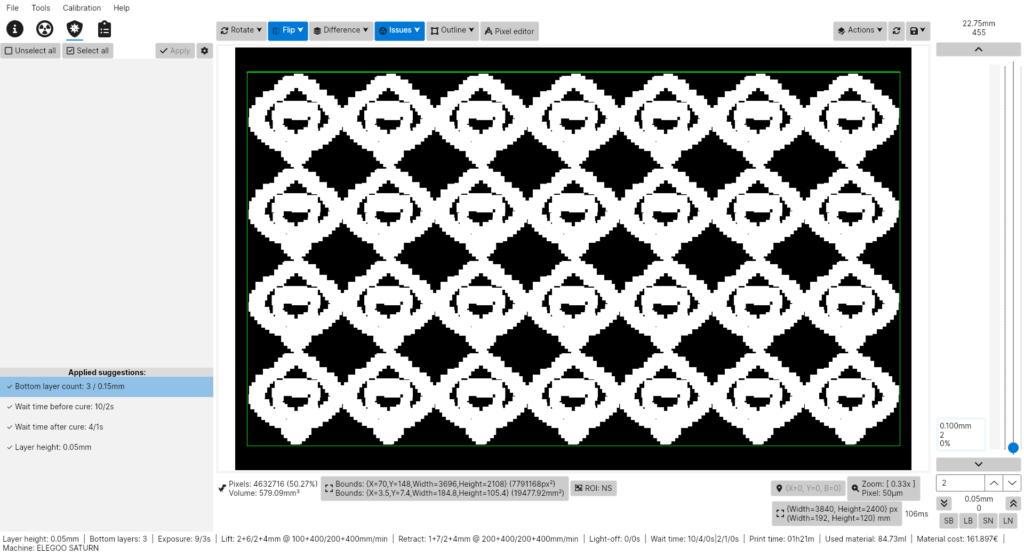
I assume that you have already UVTools downloaded. Adding rest times is hidden under the suggestions tab. The suggestions are a set of semi-automatic sanity checks of your file. When they detect unusual settings, they allow you to fix them. The usage is simple, follow the image guide:
Open UVTools
Load the file
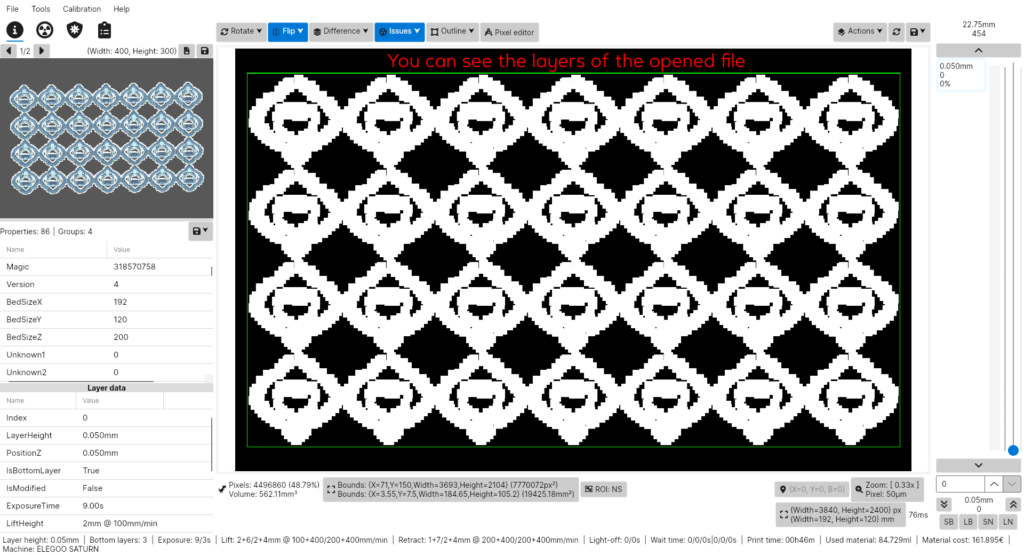
See the loaded file
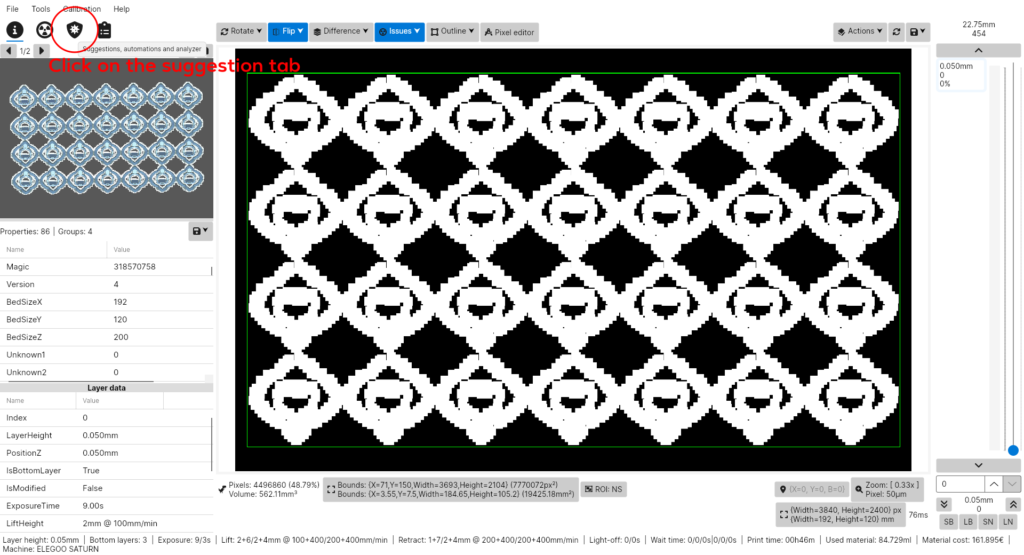
Open the suggestions tab
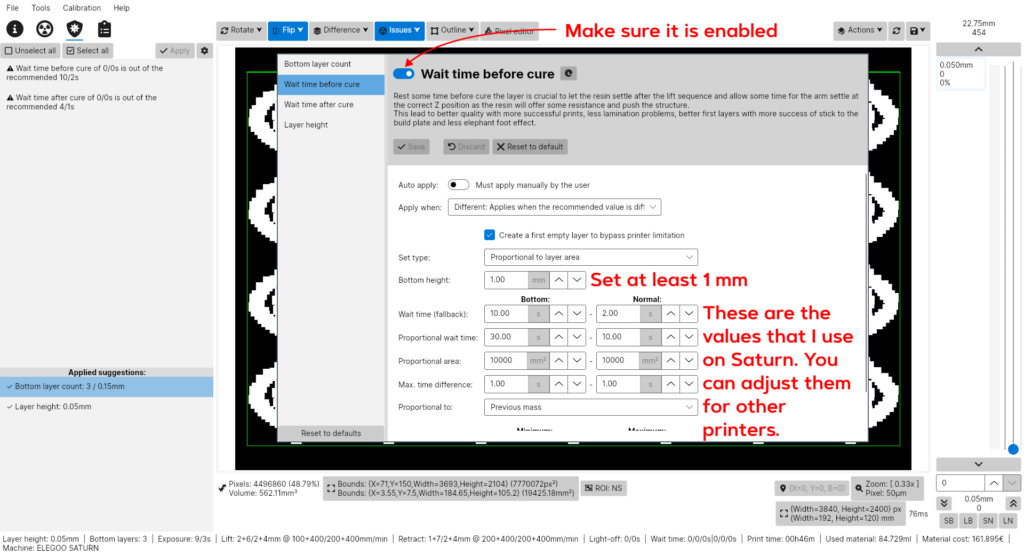
Open suggestion settings
Set the values. Don't be afraid to change them according to your printer
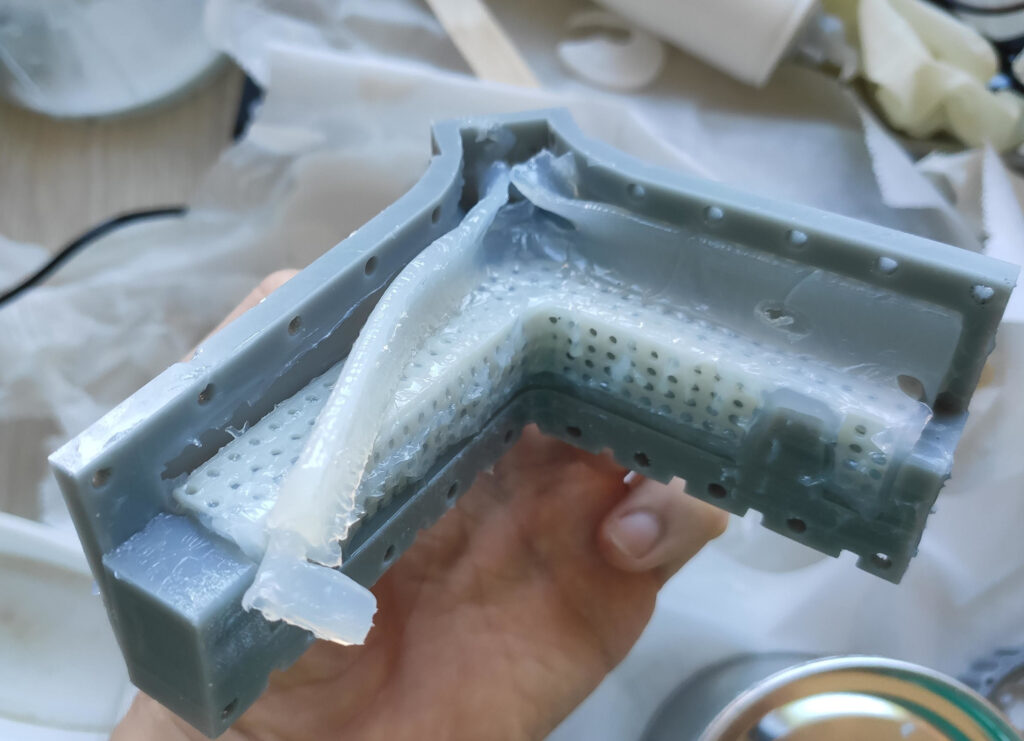
If you follow my work, you know that I use my resin 3D printers a lot to produce soft silicone molds or pieces (original blog post and a follow-up). Resin printers can create precise and detailed patterns. You can quickly prototype, cast miniatures, dices, chocolate molds… There are plenty of uses for soft silicone molds. However, some silicones play well with resin-printed patterns, and some don’t. In this post, I will explain to you which silicones cause the trouble, why we care, and also, how to prevent the cure inhibition. The recipe I give you is surprisingly easy and doesn’t require any special equipment. It actually outperforms existing commercial solutions (e.g., Inhibit X) both in terms of price and performance.
This is what happens if you cast platinum-cure silicone in resin-printed mold
This is what happens if you cast platinum-cure silicone in resin-printed mold
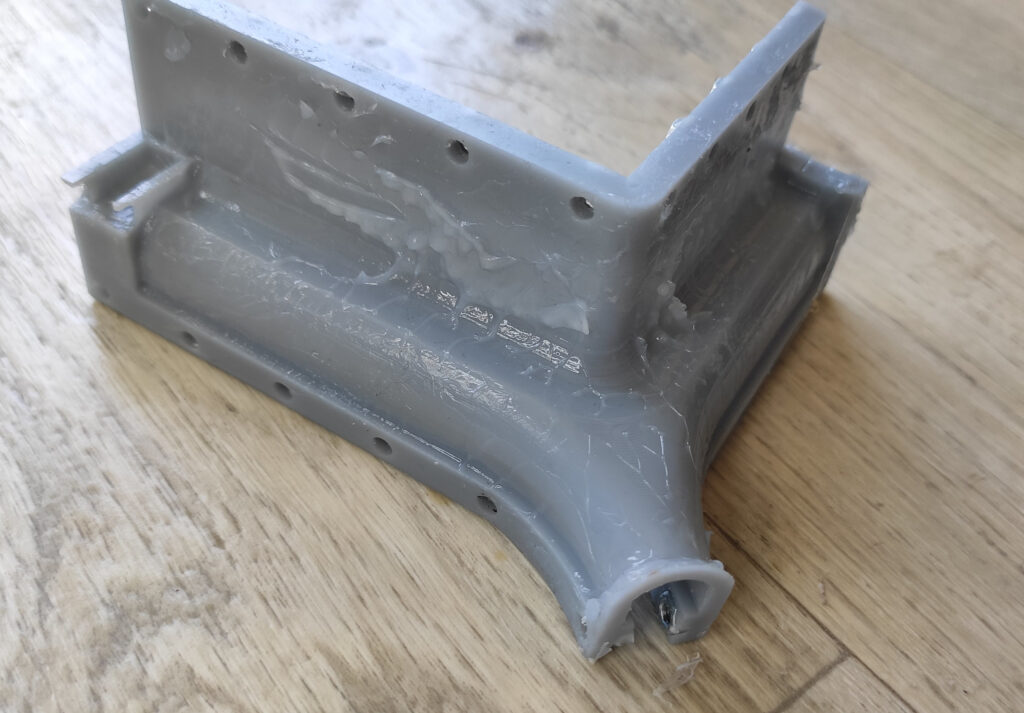
No cure inhibition after applying simple post-processing
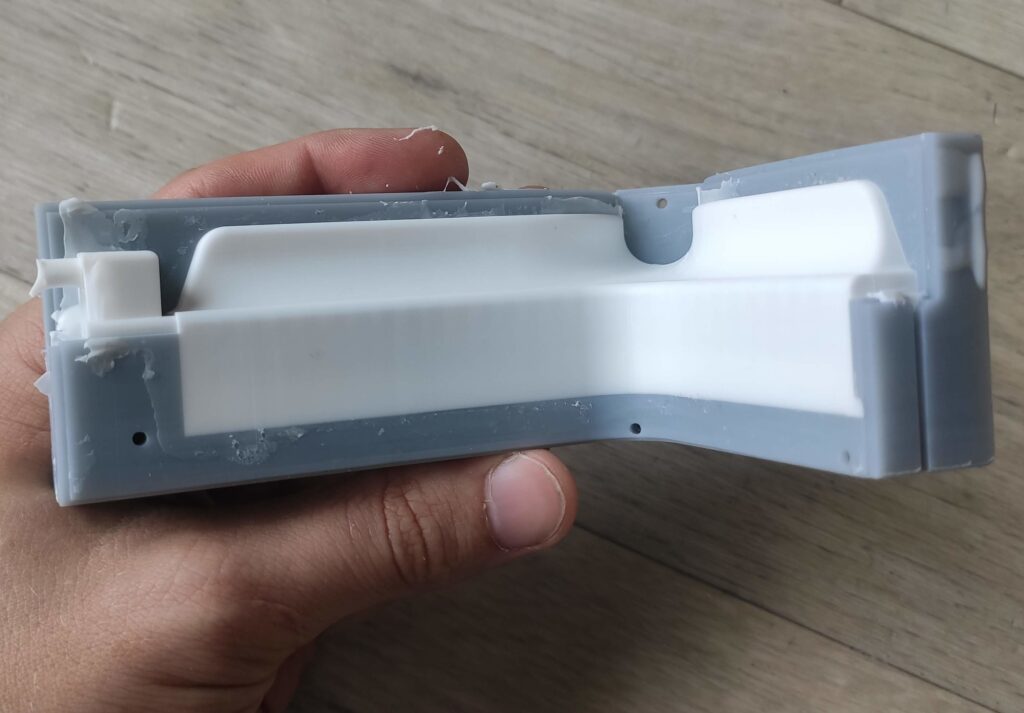
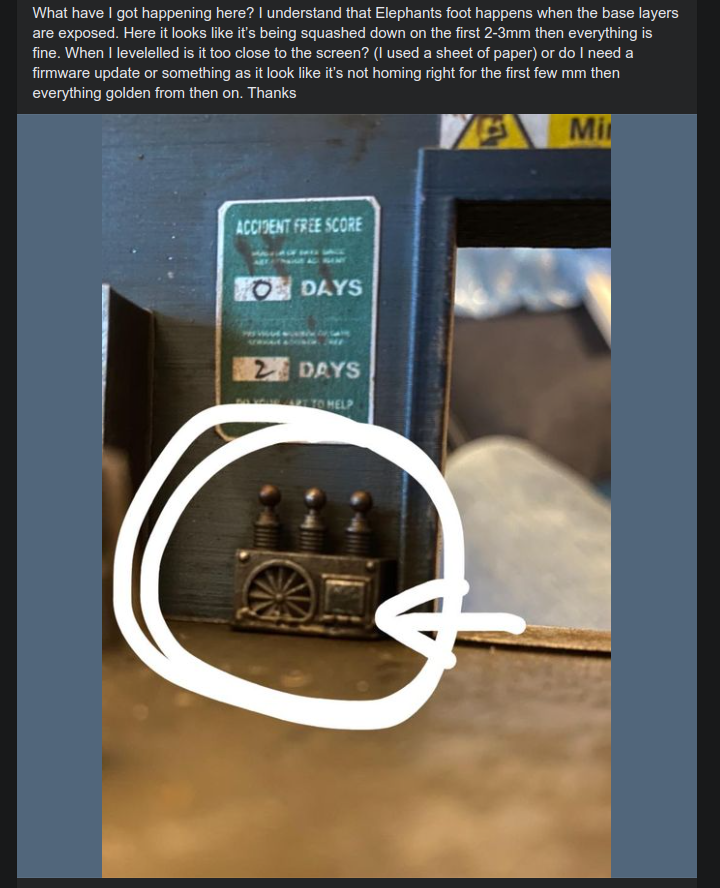
Many users of Chitu-powered resin printers complain that when they print flat on the bed, their prints are shorter than they should be – usually around 0.3–1 mm. This forces the users to print on supports. Back in the days when I started with resin printers, I observed the same thing on my Elegoo Mars. The cause of that was poor construction (see full explanation). I haven’t observed such problems on Elegoo Saturn – until now. Let’s explore what causes it and how to fix it.
You see people fighting this problem by leveling against a paper folded various number of times, setting arbitrary numbers to Z-offset and similar. Everyone has a custom recipe. I will give you my recipe which I think works the best – and unlike the others, I will explain you why. I tested everything on Elegoo Saturn, but I believe it applies to all Chitu-based printers.
In the previous blog post, we started the topic of resin shrinkage. We showed how serious it is and we presented a simple yet effective method of measuring the shrinkage amount and compensating for it.
However, the problem is more complex than the two numbers. Anyone who has ever worked with plastic injection molding can confirm this. There is a number of papers, models, and algorithms that deal with modeling shrinkage of plastics after molding. The same, unfortunately, applies to 3D printing as our material shrinks as it cures. What effects does it have? Is there something we can do about it? Yes, there is as we see at the end of the post!
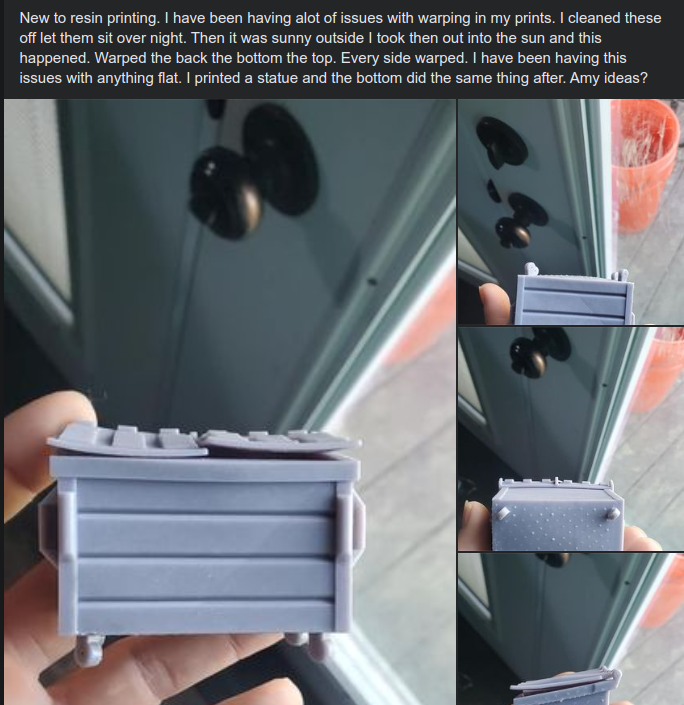
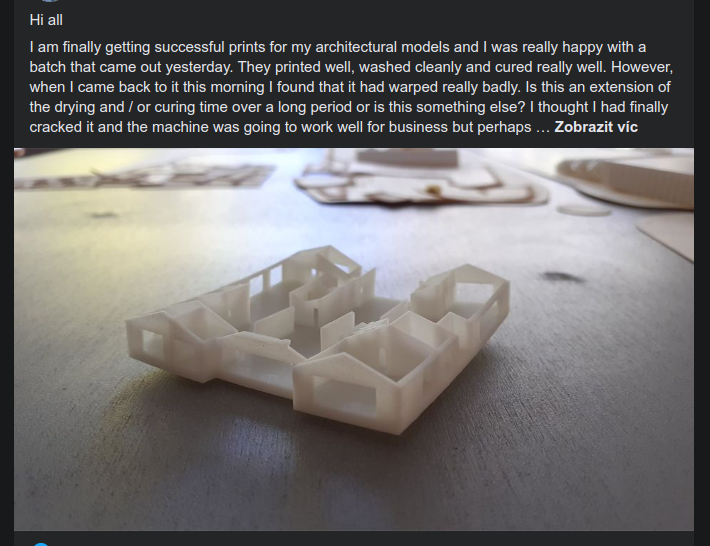
Just to illustrate what we are trying to fight, there are a couple of posts from a single FB resin printing group: